
Showing posts with label PCB layout. Show all posts
Showing posts with label PCB layout. Show all posts
Friday, November 9, 2018
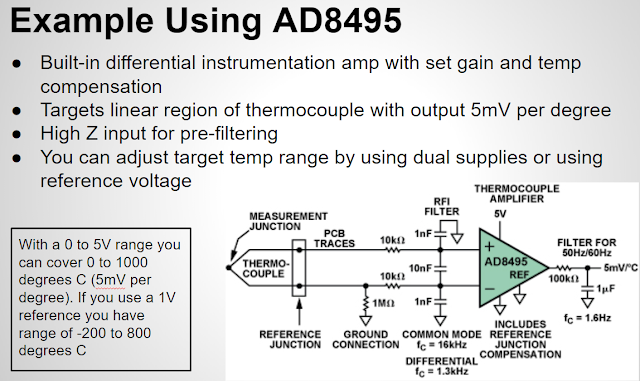
Designing a Thermocouple Temperature Measurement Circuit Part 2
In this series we look at how to design a Thermocouple temperature measurement circuit. In part 2 we look at a real world example of a Thermocouple J Type circuit design and discuss some of the common sources of error and how to avoid them.

Monday, April 9, 2018
Ground Considerations for PCB Layout of Mixed Signal Designs Part 2
In this video series we look at considerations when laying out a ground plane on a PCB when working with a mixed signal designs. If you want to ensure you are making accurate noise free ADC measurements in your design this video series is a must watch.
Reference material:
Partitioning and Layout of a Mixed-Signal PCB http://www.hottconsultants.com/pdf_files/june2001pcd_mixedsignal.pdf
Grounding in mixed-signal systems demystified, Part 1 and 2
http://www.ti.com/lit/an/slyt499/slyt499.pdf
http://www.ti.com/lit/an/slyt512/slyt512.pdf
Reference material:
Partitioning and Layout of a Mixed-Signal PCB http://www.hottconsultants.com/pdf_files/june2001pcd_mixedsignal.pdf
Grounding in mixed-signal systems demystified, Part 1 and 2
http://www.ti.com/lit/an/slyt499/slyt499.pdf
http://www.ti.com/lit/an/slyt512/slyt512.pdf
Tuesday, April 3, 2018
Ground Considerations for PCB Layout of Mixed Signal Designs Part 1
In this video we look at considerations when laying out a ground plane on a PCB when working with a mixed signal designs. If you want to ensure you are making accurate noise free ADC measurements in your design this video series is a must watch.
Partitioning and Layout of a Mixed-Signal PCB http://www.hottconsultants.com/pdf_files/june2001pcd_mixedsignal.pdf
Partitioning and Layout of a Mixed-Signal PCB http://www.hottconsultants.com/pdf_files/june2001pcd_mixedsignal.pdf
Wednesday, September 2, 2015
Contracting and Consulting Services for Open Source Hardware Design
This video provides an overview of ForceTronics LLC's contracting and consulting services. Whether you are a maker, entrepreneur, or a startup Forcetronics Contracting and Consulting Services can help turn your idea into reality leveraging the power of open source hardware.
If you are interested contact me on twitter or email:
If you are interested contact me on twitter or email:
- Twitter: @ForceTronics
- Email: forcetronics@gmail.com
Friday, July 10, 2015
Building Your Own AVR / Arduino Internet of Things (IoT) Development Board Part 4
This is part 4 in a 5 part series where we build our own AVR / Arduino Internet of Things (IoT) development board, yay! In this part we will do the PCB layout and discuss how to get our PCB manufactured.
Download Eagle Files

Libraries Used:
•Atmega 328P --> Library: SparkFun-DigitalIC Device: ATMEGA328P_PDIP
•LM317 --> Library: linear>*317 Device:317T
•Resonator ZTT16.0MHz --> Library: Adafruit Device: CERMOSCILL-THM (CERMOSCILL)
•Ceramic Cap --> Library: rcl > C-EU Device: C-EU050-030X075
•Electrolytic cap --> Library: rcl > CPOL-EU Device: CPOL-EUE2.5-6
•Resistor --> Library: resistor Device: R-EU_0207/10 (R-EU_) Package: 0207/10
•Reset switch --> Library: switch-omron Device: 10-XX
•LED --> Library: led Device: LED5MM (LED)
•Potentiometer --> Library: rcl > R-TRIMM Device: R-TRIMMT93YA
Note: Sparkfun and Adafruit libraries did not come with Eagle, but you can find them on their websites
Parts I made (included in files linked to my blog):
•ForceTronic.lbr --> All header and pin holes and 2.1mm DC Jack
•BLE_Micro_Module.lbr --> BLE Micro
Tuesday, June 2, 2015
Building Your Own AVR / Arduino Internet of Things (IoT) Development Board Part 1
In this 5 part video series we will build our own AVR / Arduino Internet of Things (IoT) development board. We will go from a design concept to prototyping our design to PCB layout of our design all the way to a tested and finished development board.
Example parts order for this project (please note that this does not include all the parts)


Example parts order for this project (please note that this does not include all the parts)


Subscribe to:
Posts (Atom)