Thursday, December 11, 2014

Reducing Arduino’s Power Consumption Part 3

Welcome to part 3 of reducing Arduino's power consumption, a must watch series for anybody building a battery powered project with Arduino. In part 3 we will look at how to use the Watch Dog Timer like an alarm clock to wake Arduino up from sleep mode. We we also look at some additional techniques to save power.


*****************************************Arduino Code*************************************************
/*
Example program for using sleep modes and watch dog timer in Arduino. This example code was used in a sleep mode tutorial video on the ForceTronics YouTube Channel.
This code is open for anybody to use at their own risk*/
     
/*WDT BYTE variables for setting timer value
     WDTO_15MS
WDTO_30MS
WDTO_60MS
WDTO_120MS
WDTO_250MS
WDTO_500MS
WDTO_1S
WDTO_2S
WDTO_4S
WDTO_8S */
     
#include <avr/sleep.h>
//We use part of the WDT library, but have to use registers as well since library does not support interrupt mode for WDT
#include <avr/wdt.h> 

int led = 13; //variable for pin that the LED is on
int tog = 1; //variable that toggles between traditional delay() function and WDT sleep delay function

void setup() {
  wdt_disable(); //Datasheet recommends disabling WDT right away in case of low probabibliy event
   pinMode(led, OUTPUT); //set up the LED pin to output
}

void loop() {
  
  if(tog) { //use traditional delay function
    digitalWrite(led, HIGH);   // turn the LED on (HIGH is the voltage level)
    delay(1000);               // wait 
    digitalWrite(led, LOW);    // turn the LED off by making the voltage LOW
    delay(1000);       // wait 
    tog = 0; //toggle variable
  }
  else { //after blinking LED setup interrupt and then go to sleep. Note that sleep will only happen once sinc
    digitalWrite(led, HIGH);   // turn the LED on (HIGH is the voltage level)
    delay(1000);   // turn the LED on (HIGH is the voltage level)//  
    digitalWrite(led, LOW);    // turn the LED off by making the voltage LOW
    delayWDT(WDTO_1S);   // Use WDT sleep delay function, argument is byte variable from WDT Library
    //delayWDT(0x06);      //Use WDT sleep delay function, argument is byte value that sets timer to 1 second
    tog = 1; //toggle variable
  }
   
}

//This function serves as a power saving delay function. The argument is a Byte type variable that is used to set the delay time
//The function sets up sleep mode in power down state. The function then sets up the WDT timer in interrupt mode and sets it.
//It then puts the Arduino to sleep for the set time. Upon wake up the WDT and sleep mode are shut off
void delayWDT(byte timer) {
  sleep_enable(); //enable the sleep capability
  set_sleep_mode(SLEEP_MODE_PWR_DOWN); //set the type of sleep mode. Default is Idle
  ADCSRA &= ~(1<<ADEN); //Turn off ADC before going to sleep (set ADEN bit to 0)
  WDTCSR |= 0b00011000;    //Set the WDE bit and then clear it when set the prescaler, WDCE bit must be set if changing WDE bit   
  WDTCSR =  0b01000000 | timer; //Or timer prescaler byte value with interrupt selectrion bit set
 // WDTCSR = 0b01000110; //This sets the WDT to 1 second
  wdt_reset(); //Reset the WDT 
  sleep_cpu(); //enter sleep mode. Next code that will be executed is the ISR when interrupt wakes Arduino from sleep
  sleep_disable(); //disable sleep mode
  ADCSRA |= (1<<ADEN); //Turn the ADC back on
}

//This is the interrupt service routine for the WDT. It is called when the WDT times out. 
//This ISR must be in your Arduino sketch or else the WDT will not work correctly
ISR (WDT_vect) 
{
  wdt_disable();
   MCUSR = 0; //Clear WDT flag since it is disabled, this is optional

}  // end of WDT_vect

Sunday, November 30, 2014

Reducing Arduino’s Power Consumption Part 2

In Part two, of this three part series, we will look at how to use the Power Reduction Register (PRR) to reduce power consumption by turning off parts of Arduino that are not being used. This series is for anybody using Arduino for a battery powered project where maximizing battery life is critical.


*************************Arduino Code***********************************
/* This Arduino Sketch is part of a tutorial on the ForceTronics YouTube Channel and demonstrates how to use the 
Power Reduction Registers (PRR). It is free and open for anybody to use at their own risk.
*/

#include <avr/power.h>
     
 /* Power Reduction Register (PRR) functions from avr/power.h library. 
 For every disable function there is an enable function
  power_adc_disable() or power_adc_enable()
  power_spi_disable() or power_spi_enable()
  power_timer0_disable() or power_timer0_enable()
  power_timer1_disable() or power_timer1_enable()
  power_timer2_disable() or power_timer2_enable()
  power_twi_disable() or power_twi_enable()
  power_all_enable() or power_all_disable()
  
  Note that for max power efficiency you should also disable the rest of the module for ADC and SPI
   SPCR = 0; //disable SPI
   ADCSRA = 0;  // disable ADC
  */

void setup() {
  delay(6000); //Delay to see normal power level first
  ADCSRA = 0;  // disable ADC by setting ADCSRA register to 0
  power_adc_disable(); //disable the clock to the ADC module
  delay(4000); //delay to see just ADC off power level
  SPCR = 0; //disable SPI by setting SPCR register to 0
  power_spi_disable(); //disable the clock to the SPI module
  delay(4000); //delay to see just ADC and SPI off power level
  power_all_disable();
}

void loop() {
  // put your main code here, to run repeatedly:
}

Tuesday, November 18, 2014

Reducing Arduino’s Power Consumption Part 1

In part 1 of this 3 part series we look at how to use Arduino's built-in sleep modes to drastically cut down on power consumption to help you build projects with longer battery life. In part 2 of this series we will look at how to use power reduction registers and in part three we will look at some other ways to wake an Arduino up from sleep mode.


<avr/sleep.h> library: http://www.nongnu.org/avr-libc/user-manual/group__avr__sleep.html

//**********************Arduino Code***********************************
/*
Example program for using sleep modes in Arduino. This example code was used in a sleep mode tutorial video on the ForceTronics YouTube Channel.
This code is open for anybody to use at their own risk

The 5 different modes are:
     *     SLEEP_MODE_IDLE         -the least power savings
     *     SLEEP_MODE_ADC
     *     SLEEP_MODE_PWR_SAVE
     *     SLEEP_MODE_STANDBY
     *     SLEEP_MODE_PWR_DOWN
These are the arguments used to set the sleep mode in the function set_sleep_mode()
     */
     
#include <avr/sleep.h>

int led = 13; //variable for pin that the LED is on
int count = 0; //variable to control how many times LED blinks before sleep

void setup() {
   sleep_enable(); //enable the sleep capability
   set_sleep_mode(SLEEP_MODE_PWR_DOWN); //set the type of sleep mode. Default is Idle
   pinMode(led, OUTPUT); //set up the LED pin to output
}

void loop() {
  
  if(count < 4) { //For first four loops blink the LED
    digitalWrite(led, HIGH);   // turn the LED on (HIGH is the voltage level)
    delay(900);               // wait 
    digitalWrite(led, LOW);    // turn the LED off by making the voltage LOW
    delay(900);       // wait 
    count++; //increment count
  }
  else { //after blinking LED setup interrupt and then go to sleep. Note that sleep will only happen once since it is disabled in ISR
    attachInterrupt(0, interruptFunction, HIGH); 
    sleep_cpu(); //enter sleep mode. Next code that will be executed is the ISR when interrupt wakes Arduino from sleep
    count = 0; //Set the count back to zero 
  }
   
}

//This is the function called when the interrupt occurs (pin 2 goes high)
//this is often referred to as the interrupt service routine or ISR
//This cannot take any input arguments or return anything
void interruptFunction() {
 detachInterrupt(0); //this function call will turn the interrupt off
 sleep_disable(); //Disable the sleep mode so even if call to sleep is executed again it will be ignored
}

Tuesday, November 11, 2014

How to Interrupt Your Arduino


In this video tutorial we will look at how to use interupts on the Arduino Uno, Arduino Pro Mini, and any Arduino using the Atmega 328. Interrupts allow you to react immediately to an external event versus trying to constantly check for it in the main loop. 


Arduino Code****************************************************************
/*
  Interrupt Example
  Demonstrates how to use interrupts. When a high level is detected at pin 2 interrupt occurs and blinks LED at pin 13

  This example code is in the public domain.
 */

// Pin 13 has an LED connected on most Arduino boards.
// give it a name:
int led = 13;
//create a variable for ISR, has to be volatile if used in interrupt
volatile int bLED = 0;

void setup() {
  //Create interrupt: 0 for pin 2 or 1 for pin 3, the name of the interrupt function or ISR, and condition to trigger interrupt 
  attachInterrupt(0, interruptFunction, HIGH); 
  pinMode(led, OUTPUT); //set up the LED pin to output
}

// the loop routine runs over and over again forever:
void loop() {
  
  if(bLED) { //if this statement becomes true then the interrupt occurred
    digitalWrite(led, HIGH);   // turn the LED on (HIGH is the voltage level)
    delay(300);               // wait 
    digitalWrite(led, LOW);    // turn the LED off by making the voltage LOW
    delay(300);               // wait 
  }
  /*
  noInterrupts(); //disables interrupts
  // critical, time-sensitive code here
  interrupts();//enables interrupts
  */
}

//This is the function called when the interrupt occurs (pin 2 goes high)
//this is often referred to as the interrupt service routine or ISR
//This cannot take any input arguments or return anything
void interruptFunction() {
 bLED = 1; //with this variable set to 1 the LED will blink
 //detachInterrupt(0); this function call will turn the interrupt off
}

Wednesday, October 29, 2014

Building an Android App to Communicate with the RN-42 Bluetooth Module

In this video we will build an Android App to communicate with the RN-42 Bluetooth module. The RN-42 is connected to Arduino Uno and the Android App we build turns on and off an LED connected to the Arduino. Below the video you will find the Arduino code and a link to download the Android App code (MIT Inventor 2 was used to build the Android App). Enjoy!


Link to download App Inventor 2 code (.aia file):
https://dl.dropboxusercontent.com/u/26591541/AndroidBTExample.aia

Arduino Code:
/*
  This sketch is part of a tutorial for connecting to and communicating with an HC-06 or an RN-42 bluetooth module using a custom Android App. 
  The bluetooth modules are connected to an Arduino and the Arduino is connected to an LED. The Android app is used to wirelessly turn on and
  off the LED using  bluetooth. 

  This code is in the public domain.
 */

// Pin 7 has a LED connected to it
int led = 7;

// the setup routine runs once when you press reset:
void setup() {
  
  Serial.begin(9600);
  // initialize the digital pin as an output and set it low initially
  pinMode(led, OUTPUT);
  digitalWrite(led, LOW);
}

// the loop routine runs over and over again forever:
void loop() {
  delay(30);
  String t; //create an empty string to store messages from Android
  while(Serial.available()) { //keep reading bytes while they are still more in the buffer
    t += (char)Serial.read(); //read byte, convert to char, and append it to string
  }
  
  if(t.length()) { //if string is not empty do the following
    if(t == "on") { //if the string is equal to "on" then turn LED on
      digitalWrite(led, HIGH); //Set digital pin to high to turn LED on
      Serial.write("LED is on"); //Tell the Android app that the LED was turned on
    }
    else if (t == "off") { 
      digitalWrite(led, LOW);  
      Serial.write("LED is off");
    } // turn the LED off by making the voltage LOW
  }
}

Friday, October 24, 2014

Building an Android App to Communicate with the HC-06 Bluetooth Module

In this video we will build an Android App to communicate with the low cost HC-06 Bluetooth module. The HC-06 is connected to Arduino Uno and the Android App we build turns on and off an LED connected to the Arduino. Below the video you will find the Arduino code and a link to download the Android App code (MIT Inventor 2 was used to build the Android App). Enjoy!


Link to download App Inventor 2 code (.aia file):
https://dl.dropboxusercontent.com/u/26591541/AndroidBTExample.aia

Arduino Code:
/*
  This sketch is part of a tutorial for connecting to and communicating with an HC-06 or an RN-42 bluetooth module using a custom Android App. 
  The bluetooth modules are connected to an Arduino and the Arduino is connected to an LED. The Android app is used to wirelessly turn on and
  off the LED using  bluetooth. 

  This code is in the public domain.
 */

// Pin 7 has a LED connected to it
int led = 7;

// the setup routine runs once when you press reset:
void setup() {
  
  Serial.begin(9600);
  // initialize the digital pin as an output and set it low initially
  pinMode(led, OUTPUT);
  digitalWrite(led, LOW);
}

// the loop routine runs over and over again forever:
void loop() {
  delay(30);
  String t; //create an empty string to store messages from Android
  while(Serial.available()) { //keep reading bytes while they are still more in the buffer
    t += (char)Serial.read(); //read byte, convert to char, and append it to string
  }
  
  if(t.length()) { //if string is not empty do the following
    if(t == "on") { //if the string is equal to "on" then turn LED on
      digitalWrite(led, HIGH); //Set digital pin to high to turn LED on
      Serial.write("LED is on"); //Tell the Android app that the LED was turned on
    }
    else if (t == "off") { 
      digitalWrite(led, LOW);  
      Serial.write("LED is off");
    } // turn the LED off by making the voltage LOW
  }
}


Saturday, October 18, 2014

Building a Smart Thermostat Part 3

Welcome to the third and final part of the Smart Thermostat project! In part three we build the Android App to monitor and control the thermostat remotely via Bluetooth. To build the Android App we will use MIT App Inventor 2. If you would like a copy of the Android App code just email me at forcetronics@gmail.com


To get Arduino code from GitHub: https://github.com/ForceTronics/SmartThermoStat

To access MIT App Inventor 2 go to: http://ai2.appinventor.mit.edu\


Sunday, August 31, 2014

Building a Smart Thermostat Part 2

This is part 2 of the Smart Thermostat project. In part 2 we add the following features to our thermostat design:

  • Bluetooth control so the thermostat can be controlled remotely so you can control the temperature of your home from the comfort of your couch or bed
  • Mount the project so it is in a much more usable and aesthetically pleasing form then the prototype form it we saw in part 1
  • A power save mode to cut down on the utility costs 

In part three we will create the Android app and add a power supply to run it off of the 24 VAC signal coming from the HVAC system. To download the Arduino code follow the GitHub link below. Please share your comments!

Arduino code from GitHub


Smart Thermostat Part 2

Sunday, August 10, 2014

Getting Started with the HC-06 Bluetooth Module

In this video we look at how to get started with the HC-06 Bluetooth transceiver module. The HC-06 is a great low cost way to add wireless communication to any project. Since the HC-06 uses a serial line to communicate it is easy to pair it with an Arduino.


AT CommandREply from HC-06COMMENTs
ATOKUsed to verify communication
AT+VERSIONOKlinvorV1.8The firmware version
AT+NAMEmyBTOKsetnameSets the module name to “myBT”
AT+PIN1234OKsetPINSets the module PIN to 1234
AT+BAUD1OK1200Sets the baud rate to 1200
AT+BAUD2OK2400Sets the baud rate to 2400
AT+BAUD3OK4800Sets the baud rate to 4800
AT+BAUD4OK9600Sets the baud rate to 9600
AT+BAUD5OK19200Sets the baud rate to 19200
AT+BAUD6OK38400Sets the baud rate to 38400
AT+BAUD7OK57600Sets the baud rate to 57600
AT+BAUD8OK115200Sets the baud rate to 115200
AT+BAUD9OK230400Sets the baud rate to 230400
AT+BAUDAOK460800Sets the baud rate to 460800
AT+BAUDBOK921600Sets the baud rate to 921600
AT+BAUDCOK1382400Sets the baud rate to 1382400

Method 1 Setup
/*This sketch Configures the name and baud rate of an HC 06 Bluetooth module */
char message1[10];//need length of chars being read +1 for null character
char message2[9];

void setup() {
  // set baud rate then delay to give user time to open serial monitor
  Serial.begin(9600);
  delay(5000);
  //Send command to set name of HC06 module, with the below command name will change to "forcetronics"
  Serial.print("AT+NAMEForceT");
  delay(600); //HC06 requires 500 msec for reply
  int8_t count = 0; //declare and intialize count 
  while(1) { //loop until OKsetname is read and cleared from buffer
    if(Serial.available()) {
        message1[count] = Serial.read(); //read in char
        count++; 
        if(count == 9) break; //after we get all 9 char break out of loop
    }
    delay(10);
  }
  
  //Send AT command to change baud rate to 115200
  Serial.print("AT+BAUD8");
  delay(600); //HC06 requires 500 msec for reply
  count = 0; //intialize count
  while(1) { //loop until OK115200 is read and cleared from buffer
    if(Serial.available()) {
        message2[count] = Serial.read(); 
        count++; 
        if(count == 8) break; 
    }
    delay(10);
  }
  
  //print out each message to make sure it worked
  Serial.println("");
  Serial.println(message1);
  Serial.println(message2);
}

void loop() {
 //do nothing
  delay(50);
}


Method 2 Setup


//Example code for testing a serial bluetooth device using Arduino and a serial terminal on a computer
void setup() {
  // set baud rate to match BT module
  Serial.begin(115200);
}

void loop() {
  
  String t; //string to hold data from BT module 
  while(Serial.available()) { //keep reading bytes while they are still more in the buffer
    t += (char)Serial.read(); //read byte, convert to char, and append it to string
  }
  
  if(t.length()) { //if string is not empty do the following
    
    if(t == "Hi Uno\r\n") { Serial.print("Hello Neil\n"); } //say hello
    else if(t == "Meaning of life?\r\n") { //find out the meaning of life
      delay(1000);
      Serial.print("Money. ");
      delay(1000);
      Serial.print("Guns. ");
      delay(1000);
      Serial.print("Hoes.\n");
      delay(1000);
      Serial.print("Arduino.\n");
   }
   else { Serial.print("Syntax Error\n"); } //send this for any other string
  }
   delay(20);
}

Friday, July 25, 2014

Building a Smart Thermostat Part 1

In this project we will build a smart thermostat with features such as high accuracy temperature measurements, customized user interface, and, best of all, wireless control from an Android device. Since this is a big project it will be presented in three parts. This is part one where we will cover the basic design and get to a working prototype. To download the Arduino code follow the GitHub link below. Please share your comments!

Arduino code from GitHub


Smart Thermstat Part 1 (prototype)


Sunday, June 1, 2014

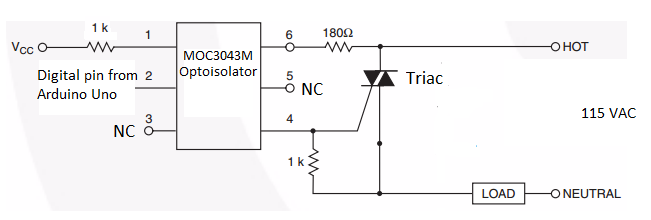
Switching AC Line Power with a Thyristor (TRIAC)

In this video we look at how to use a Thyristor (TRIAC) as an AC line power switch. Great tool to use in home automation projects for turning on or off a light or building your own thermostat.


Thyristor Example Circuit


//This sketch is used to control Thyristor that is used as a switch to turn on and off an AC line powered light. //This code is free for all to use
int8_t dig = 1; //default is high for light off

void setup() {
  //for controlling Thyristor
  pinMode(3, OUTPUT); //set pin to output so it can sink current from optoisolator
  digitalWrite(3, HIGH); //when high the thyristor is off or open
}

void loop() {
  delay(2000); //light turns on / off every 2 seconds
  togLight(); //call function to turn light on / off using digital pin
}

void togLight() {
  if(dig) { 
     digitalWrite(3, HIGH); //turn off light
     dig = 0; //toggle dig value
  }
  else {  
     digitalWrite(3, LOW); //turn light on
     dig = 1; 
   }
}


Sunday, May 11, 2014

Android / Arduino Remote Control Car

In this post we build a remote control car using Arduino, Bluetooth, and an Android device. The Android device serves as the controller. One cool factor of this project is our Android app uses the position of the Android device to control the car!


RC Car Schematic
/* This sketch is for a remote controlled car with four electric motors that uses the Arduino Uno, RN42 Bluetooth module, and an
Adafruit Motorshield. This code is free for anybody to use or modify
*/

#include <Wire.h> //needed for motors and motor shield
#include <Adafruit_MotorShield.h> //needed for motors and motor shield
#include "utility/Adafruit_PWMServoDriver.h" //needed for motors and motor shield
#include <ctype.h>

int con = 0; //global variable to track connection status
// Create the motor shield object with the default I2C address
Adafruit_MotorShield AFMS = Adafruit_MotorShield(); 
// create an object for each motor and assign it to a port on the shield 
Adafruit_DCMotor *M1 = AFMS.getMotor(1);
Adafruit_DCMotor *M2 = AFMS.getMotor(2);
Adafruit_DCMotor *M3 = AFMS.getMotor(3);
Adafruit_DCMotor *M4 = AFMS.getMotor(4);
int count = 0; //counts how long its been since comms from joystick
 String uDSpeed = "500"; //create global variables to hold speed and direction info
 String lRSpeed = "500"; //defulat is 500 because that is stop condition

//setup code only executed once
void setup() {
  Serial.begin(115200); //start serial commm
  
  //This loop runs until a connection from another RN42 is complete and a "#" is recieved from the car
  //The joystick RN42 is the slave
  while(!con) { 
    if((char)Serial.read() == '#') { con = 1; }//once connected change "con" to true
    delay(5);
  }

 AFMS.begin();  //Start motor shield object, create with the default frequency 1.6KHz


void loop() {
  
  //check if a full speed / direction frame is ready to be read
  if(Serial.available() >= 6) {
    String temp; //temperary string to hold incoming data
    char c = (char)Serial.read();
    if(c == 'u') { //If a 'u' was read this is start of an up / down data frame
      for(int i=0; i<5; i++) { //loop to read 5 other bytes of frame
        if(i < 4) { //reads the speed portion of frame into string 
          temp += (char)Serial.read();
        }
        else { //look for end of frame 'd' character, if it is there save this reading as new speed
          if((char)Serial.read() == 'd') { 
           uDSpeed = temp; 
           count = 0; //just got speed so reset count
          }
        }
      }
    }
    else if(c == 'l') { //If a 'l' was read this is start of an left / right data frame
      for(int i=0; i<5; i++) { //following code is the same as above except for direction frame
        if(i < 4) {
          temp += (char)Serial.read();
        }
        else {
          if((char)Serial.read() == 'r') { 
           lRSpeed = temp; 
           count = 0; //just got speed so reset count
          }
        }
      }
    }
  }
  
  delay(1);
  //the following code will stop the car if no comms with joystick for 150ms
  count++;
  if(count > 20) {
    setMotorSpeed(500,500);
  }
  
  //function call to set motor speeds
  setMotorSpeed(uDSpeed.toInt(),lRSpeed.toInt());
}

//This function clears all bytes out of arduino serial read buffer
void clearSerialBuf() {
 while(Serial.available()) { Serial.read(); }
}

//This function uses the ADC values from the joystick and turns them into motor speeds for going 
//forware, right, left, and reverse. Inputs are the left/right and up/down joystick axis
void setMotorSpeed(int upDown, int leftRight) {
  int lR = 0;
  int bF = 0;
  
  //If left/right is 500 no turn 
  if(leftRight == 500) {
    lR = 0;
  }
   else if(leftRight > 500) { //If greater than 500 this is a right turn
     lR = 1;
     leftRight = leftRight - 500;
   }
   else { //less than 500 this is a left turn
     lR = 2;
     leftRight = 500 - leftRight;
   }
   
   if(upDown == 500) { //500 no up/down direction
      bF = 0;
   }
   else if(upDown > 500) {//more than 500 go forward
     bF = 1;
     upDown = upDown - 500;
   }
   else { //less than 500 go backward
     bF = 2;
     upDown = 500 - upDown;
   }
   
   //If direction variables are both 0 the car is stopped
   if(lR == 0 && bF == 0) {
     motorStop();
   }
   else if (bF==1) { //if forward variable is true
     if(lR == 0) { //no turn so go straight forward
       goForward(scaleSpeed(upDown));
     }
     else if(lR == 1) { //go forward and right
       goTurn(scaleSpeed(scaleTurn(upDown,leftRight)), scaleSpeed(upDown), 1);
     }
     else { //go forward and left
       goTurn(scaleSpeed(upDown),scaleSpeed(scaleTurn(upDown,leftRight)), 1);
     }
   }
   else if (bF==2) { //if backwards variable is true
     if(lR == 0) { //go straight backwards
       goBackward(scaleSpeed(upDown));
     }
     else if(lR == 1) { //go backward and right
       goTurn(scaleSpeed(scaleTurn(upDown,leftRight)), scaleSpeed(upDown), 0);
     }
     else { //go backward and left
       goTurn(scaleSpeed(upDown),scaleSpeed(scaleTurn(upDown,leftRight)), 0);
     }
   }
   else { //if no forward or back then just turn
     if(lR==1) { //Right turn, left wheels forward and right wheels backwards
       goRight(scaleSpeed(leftRight));
     }
     else { //left turn, right wheels forward and left wheels backwards
       goLeft(scaleSpeed(leftRight));
     }
   }
}

//function to stop the motors
void motorStop() {
  M2->run(RELEASE);
  M4->run(RELEASE);
  M1->run(RELEASE);
  M3->run(RELEASE);
}

//function to tell motors to go forward, input is speed
void goForward(int mSpeed) {
  M1->setSpeed(mSpeed);
  M2->setSpeed(mSpeed);
  M3->setSpeed(mSpeed);
  M4->setSpeed(mSpeed);
  M2->run(FORWARD);
  M4->run(FORWARD);
  M1->run(FORWARD);
  M3->run(FORWARD);
}

//function to tell motors to go backward, input is speed
void goBackward(int mSpeed) {
  M1->setSpeed(mSpeed);
  M2->setSpeed(mSpeed);
  M3->setSpeed(mSpeed);
  M4->setSpeed(mSpeed);
  M2->run(BACKWARD);
  M4->run(BACKWARD);
  M1->run(BACKWARD);
  M3->run(BACKWARD);
}


//function for left or right turn. inputs are speed for left tires and speed for right tires
//and whether we are going forward or backwards
void goTurn(int rTire, int lTire, int forward) {
  
  M1->setSpeed(rTire);
  M2->setSpeed(lTire);
  M3->setSpeed(rTire);
  M4->setSpeed(lTire);
   //code to turn Right
  if(forward) {
    M2->run(FORWARD); //M2 and M4 are left tires
    M4->run(FORWARD);
    M1->run(FORWARD); //M1 and M3 are right tires
    M3->run(FORWARD);
  }
  else {
    M2->run(BACKWARD);
    M4->run(BACKWARD);
    M1->run(BACKWARD);
    M3->run(BACKWARD);
  }
}

//right turn function, no forward or backwards motion
void goRight(int tSpeed) {
  tSpeed = tSpeed - (tSpeed*.2); //reduce speed by 20%
  M1->setSpeed(tSpeed);
  M2->setSpeed(tSpeed);
  M3->setSpeed(tSpeed);
  M4->setSpeed(tSpeed);
   //code to turn Right
  M2->run(FORWARD); //left tires
  M4->run(FORWARD);
  M1->run(BACKWARD); //right tires
  M3->run(BACKWARD);
}

//left turn function, no forward or backwards motion
void goLeft(int tSpeed) {
  tSpeed = tSpeed - (tSpeed*.2); //reduce speed by 20%
  M1->setSpeed(tSpeed);
  M2->setSpeed(tSpeed);
  M3->setSpeed(tSpeed);
  M4->setSpeed(tSpeed);
   //code to turn Right
  M2->run(BACKWARD); //left tires
  M4->run(BACKWARD);
  M1->run(FORWARD); //right tires
  M3->run(FORWARD);
}

//This function scales the speed values from the joystick ADCs to the speed values of the motors
int scaleSpeed(int scale) {
  float r = ((float)scale/500)*250;
  return int(r);
}

//This scales the turns based on the forward / backward speeds
int scaleTurn(int fBSp, int lRSp) {
  float r =(float)fBSp*(1 - (float)lRSp/500);
  return int(r);
}