Showing posts with label cloud. Show all posts

Wednesday, September 14, 2022

How to Control Water Flow with Arduino IoT Cloud and a Solenoid Parts 1 and 2

In this two part series we look at how to control a Solenoid using an ESP32 board and the Arduino IoT Cloud. In part one we focus on what a solenoid is and the hardware needed to drive a solenoid open or closed. In part 2 we focus on setting up the Arduino IoT Cloud control.

\


Link to tutorial on setting up device on Arduino IoT Cloud: https://docs.arduino.cc/arduino-cloud/getting-started/esp-32-cloud


//**************Arduino Code from Tutorial*********************
#include "thingProperties.h"

#define SOLENOID_PIN 21

void setup() {
  pinMode(SOLENOID_PIN,OUTPUT);
  digitalWrite(SOLENOID_PIN,LOW);

  // Defined in thingProperties.h
  initProperties();

  // Connect to Arduino IoT Cloud
  ArduinoCloud.begin(ArduinoIoTPreferredConnection);
  
  /*
     The following function allows you to obtain more information
     related to the state of network and IoT Cloud connection and errors
     the higher number the more granular information you’ll get.
     The default is 0 (only errors).
     Maximum is 4
 */
  setDebugMessageLevel(2);
  ArduinoCloud.printDebugInfo();
}

void loop() {
  ArduinoCloud.update();
  
  if(water_Scheduler.isActive() || solenoidState) {
    digitalWrite(SOLENOID_PIN, HIGH);
  }
  else {
    digitalWrite(SOLENOID_PIN, LOW);
  } 
}


/*
  Since SolenoidState is READ_WRITE variable, onSolenoidStateChange() is
  executed every time a new value is received from IoT Cloud.
*/
void onSolenoidStateChange()  {
  // Add your code here to act upon SolenoidState change
  /*
  if (solenoidState) {
    digitalWrite(SOLENOID_PIN, HIGH);
  }
  else {
    digitalWrite(SOLENOID_PIN, LOW);
  } 
  */
}

/*
  Since WaterScheduler is READ_WRITE variable, onWaterSchedulerChange() is
  executed every time a new value is received from IoT Cloud.
*/
void onWaterSchedulerChange()  {
  // Add your code here to act upon WaterScheduler change
}

Friday, November 23, 2018

Unboxing Particle's Mesh Network IoT Series (Boron and Xenon)

In this video we unbox Particle's new IoT Mesh Network series (Argon, Boron, Xenon). We take a look both the hardware and the software that allows you to easily create a cloud connected mesh network. Link to product page: https://www.particle.io/mesh


//******************Code from Video*****************************************
// -----------------------------------
// Controlling LEDs over the Internet
// -----------------------------------

// First, let's create our "shorthand" for the pins
// Same as in the Blink an LED example:
// led1 is D0, led2 is D7

int led1 = D0;
int led2 = D7;

// Last time, we only needed to declare pins in the setup function.
// This time, we are also going to register our Particle function

void setup()
{

   // Here's the pin configuration, same as last time
   pinMode(led1, OUTPUT);
   pinMode(led2, OUTPUT);

   // We are also going to declare a Particle.function so that we can turn the LED on and off from the cloud.
   Particle.function("led",ledToggle);
   // This is saying that when we ask the cloud for the function "led", it will employ the function ledToggle() from this app.

   // For good measure, let's also make sure both LEDs are off when we start:
   digitalWrite(led1, LOW);
   digitalWrite(led2, LOW);

}


// Last time, we wanted to continously blink the LED on and off
// Since we're waiting for input through the cloud this time,
// we don't actually need to put anything in the loop

void loop()
{
   // Nothing to do here
}

// We're going to have a super cool function now that gets called when a matching API request is sent
// This is the ledToggle function we registered to the "led" Particle.function earlier.


int ledToggle(String command) {
    /* Particle.functions always take a string as an argument and return an integer.
    Since we can pass a string, it means that we can give the program commands on how the function should be used.
    In this case, telling the function "on" will turn the LED on and telling it "off" will turn the LED off.
    Then, the function returns a value to us to let us know what happened.
    In this case, it will return 1 for the LEDs turning on, 0 for the LEDs turning off,
    and -1 if we received a totally bogus command that didn't do anything to the LEDs.
    */

    if (command=="on") {
        digitalWrite(led1,HIGH);
        digitalWrite(led2,HIGH);
        Particle.publish("LED State", "ON");
        return 1;
    }
    else if (command=="off") {
        digitalWrite(led1,LOW);
        digitalWrite(led2,LOW);
        Particle.publish("LED State", "OFF");
        return 0;
    }
    else {
        return -1;
    }
}

Thursday, August 10, 2017

Getting Started with Arduino and the ThingSpeak Cloud

In this video we look at how to use Arduino with the ThingSpeak IoT, cloud, and analytics platform. In the video we look at two use cases of ThingSpeak. For the first use case we log wireless sensor data to the cloud and perform post processing on the data using MATLAB. In the second use case we monitor a room with a wireless motion detector setup and have ThingSpeak send out a Tweet if any movement is detected in the room.


//*****************Arduino code from video**********************************
/*
This sketch was created for a video tutorial on the ForceTronics YouTube that shows how to use Arduino with the ThingSpeak cloud
This code is public domain and free for anybody to use or modify at their own risk

Note this code was leveraged from:
 Arduino --> ThingSpeak Channel via MKR1000 Wi-Fi
 Created: May 7, 2016 by Hans Scharler (http://www.nothans.com)
*/
   
#include <SPI.h>
#include <WiFi101.h> //This sketch should work with any Arduino or shield that can use the WiFi101 library

char ssid[] = "YourNetwork"; //  your network SSID (name)
char pass[] = "YourPassword"; // your network password

int status = WL_IDLE_STATUS;

// Initialize the Wifi clients
WiFiClient tClient; //this one is used to post temperature data
WiFiClient mClient; //this one is used to post motion detection data

// ThingSpeak Settings
char server[] = "api.thingspeak.com";
String writeAPIKey = "YourWriteKey";

//Timing variables for tracking temperature posting
unsigned long tempLastConnectionTime = 0; // track the last connection time
const unsigned long tempPostingInterval = 295000L; // post temp ADC value just under every 5 min

//Timing and logic variables for tracking temperature posting
unsigned long mLastConnectionTime = 0; // track the last connection time
const unsigned long mPostingInterval = 30000L; //checks to see if motion was detected every 30 sec
bool mReset = true; //tracks if motion detection has been reset

void setup() {
  pinMode(2,INPUT); //digital pin used to read output of motion detector
  pinMode(6,OUTPUT); //LED pin used to know when data is sent to cloud
  
  // attempt to connect to Wifi network
  while ( status != WL_CONNECTED) {
    // Connect to WPA/WPA2 Wi-Fi network
    status = WiFi.begin(ssid, pass);
    // wait 10 seconds for connection
    delay(10000);
  }
}

void loop() {
  //timer to know when it is time to post temp data to cloud
  if (millis() - tempLastConnectionTime > tempPostingInterval) {
    digitalWrite(6,HIGH); //Use the LED to see if Arduino gets heldup posting data to the cloud
    tempHttpRequest(); //function that formats data strings and posts data to ThingSpeak cloud
    digitalWrite(6,LOW);
  }

  if (millis() - mLastConnectionTime > mPostingInterval) {
    digitalWrite(6,HIGH); //Use the LED to see if Arduino gets heldup posting data to the cloud
    if(digitalRead(2) && mReset) { //if motion was detected post it
      mReset = false; //motion detected so reset variable
      mHttpRequest(); //if true motion was detected so post to cloud
    }
    else mReset = true; //reset logic tracker
    
    digitalWrite(6,LOW);
  }

}

//Posts temp data to thingspeak cloud
void tempHttpRequest() {
  // read analog pin 0 with temp sensor connected
  int sensorValue = analogRead(0);

  // create data string to send to ThingSpeak
 String data = String("field1=" + String(sensorValue, DEC)); 

  // POST data to ThingSpeak
  if (tClient.connect(server, 80)) {
    tClient.println("POST /update HTTP/1.1");
    tClient.println("Host: api.thingspeak.com");
    tClient.println("Connection: close");
    tClient.println("User-Agent: ArduinoWiFi/1.1");
    tClient.println("X-THINGSPEAKAPIKEY: "+writeAPIKey);
    tClient.println("Content-Type: application/x-www-form-urlencoded");
    tClient.print("Content-Length: ");
    tClient.print(data.length());
    tClient.print("\n\n");
    tClient.print(data);
     // close any connection before sending a new request
    tClient.stop();
    // note the last connection time
    tempLastConnectionTime = millis();
  }
}

//posts motion detection data to thingspeak cloud
void mHttpRequest() {

  // create data string to send to ThingSpeak, we always send a one here to indicate motion detected
 String data = String("field2=" + String(1,DEC)); 

  // POST data to ThingSpeak
  if (mClient.connect(server, 80)) {
    mClient.println("POST /update HTTP/1.1");
    mClient.println("Host: api.thingspeak.com");
    mClient.println("Connection: close");
    mClient.println("User-Agent: ArduinoWiFi/1.1");
    mClient.println("X-THINGSPEAKAPIKEY: "+writeAPIKey);
    mClient.println("Content-Type: application/x-www-form-urlencoded");
    mClient.print("Content-Length: ");
    mClient.print(data.length());
    mClient.print("\n\n");
    mClient.print(data);
     // close any connection before sending a new request
    mClient.stop();
    // note the last connection time
    mLastConnectionTime = millis();
  }
}

%*************************MATLAB code from video***************************
% Channel ID to read raw ADC temp data from
readChannelID = chanID;
% Temperature Field ID
TemperatureFieldID = 1;

% Channel Read API Key 
readAPIKey = 'YourReadKey';

% Channel ID to write temp data to:
writeChannelID = [chanID];
% API key for write channel:
writeAPIKey = 'YourWriteKey';

%Read raw ADC temp data
aDC = thingSpeakRead(readChannelID, 'Fields', TemperatureFieldID, 'ReadKey', readAPIKey);

%Convert raw 10 bit ADC data to voltage
volt = aDC*(3.3/1023);

%Using analog temp sensor TMP36
%calculate temp in C, .75 volts is 25 C. 10mV per degree
 if volt < .75 
     temp = 25 - ((.75-volt)/.01); %if below 25 C
 elseif volt == .75 
         temp = 25;
 else 
     temp = 25 + ((volt -.75)/.01);  %if above 25
 end

% Convert to Fahrenheit
tempF = (9/5*temp) + 32;

%This writes temp value to below console for debugging
display(tempF);

%write temp F value to channel
thingSpeakWrite(writeChannelID, 'Fields',1,'Values',tempF, 'Writekey', writeAPIKey);

Tuesday, May 30, 2017

Home Automation with Arduino and the Amazon Echo Part 4

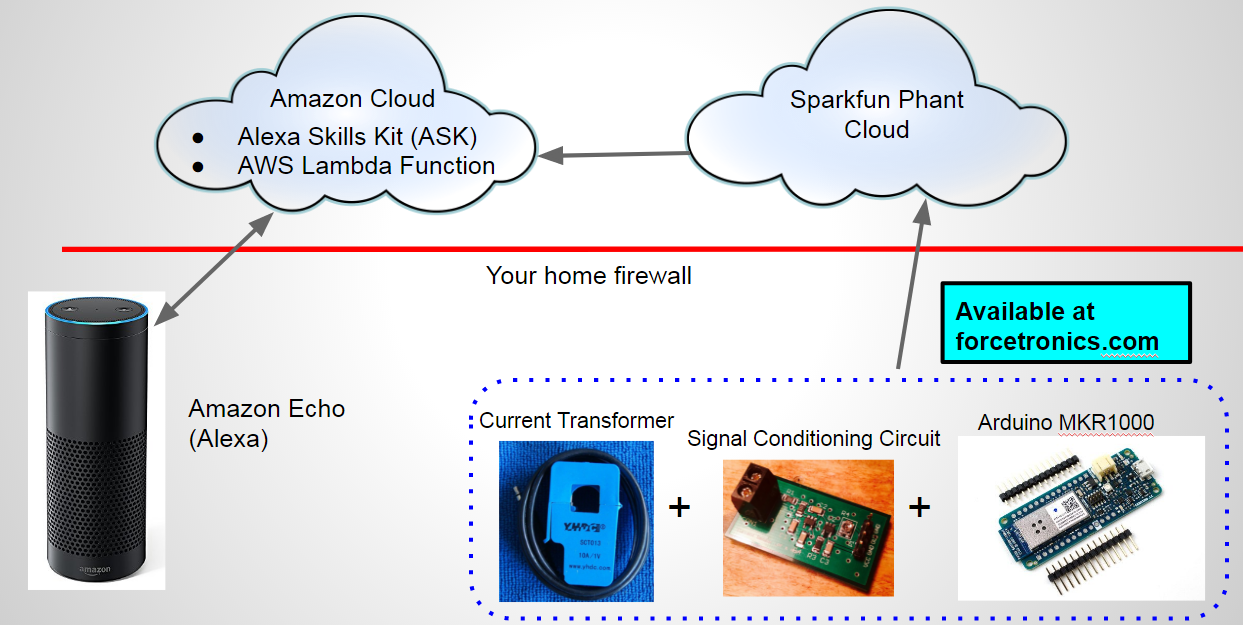
In the final conclusion of this four part series on using the Amazon Echo and Arduino for home automation we look at the Arduino hardware setup for monitoring the current consumption of a washer machine and reports its state to the cloud.


You can access code from GitHub: https://github.com/ForceTronics/Arduino_Echo_Home_Automation


Friday, May 26, 2017

Home Automation with the Arduino and the Amazon Echo Part 3

In part 3 instead of controlling a household device with the Echo, Arduino, and the cloud like we did in parts 1 and 2, we are monitoring an appliance (washer) so the data is flowing in the opposite direction.


You can access the code on github:  https://github.com/ForceTronics/Arduino_Echo_Home_Automation


Thursday, April 6, 2017

Home Automation with the Arduino and the Amazon Echo Part 2

In this video series we look at how to use Arduino (ESP8266) and the Amazon Echo to do voice controlled home automation.


Link to project material on GitHub: https://github.com/ForceTronics/Arduino_Echo_Home_Automation

//************************************ESP8266 Arduino code*********************
/*
 This sketch was created for a video series called Home Automation with the Arduino and the Amazon Echo Part 2 
 That was presented on the ForceTronics YouTube Channel. This code is public domain for anybody to use or modify at your own risk
 Note that this code was leveraged from a Sparkfun example on using their cloud service Phant
 */

// Include the ESP8266 WiFi library
#include <ESP8266WiFi.h>
// Include the SparkFun Phant library.
#include <Phant.h>

//Set your network name and password
const char WiFiSSID[] = "NetworkName"; //your wifi network name goes here
const char WiFiPSK[] = "NetworkPassword"; //your wifi password goes here

//define constants for pin control and node number
const int light = 4; //NodeMCU GPIO 4 pin is connected to the WiFi AC Switch control
const char parseKey[] = "stamp"; //This is used to parse through data from Phant to find light setting

//declare phant address and security keys
const char PhantHost[] = "data.sparkfun.com";
const char gPublicKey[] = "YourPublicKey"; //your phant public key goes here
const char gPrivateKey[] = "YourPrivateKey"; //your phant private key goes here

//specify the rate that you post data to cloud
const unsigned long postRate = 1000;
unsigned long lastPost = 0;

void setup() 
{
  initHardware(); //setup arduino hardware
  connectWiFi(); //Connect your WiFi network
  digitalWrite(LED_BUILTIN, HIGH); //turn on LED
}

void loop() 
{ //loop until it is time to post data to phant cloud, variable "postRate" defines the interval in milli seconds
  if (lastPost + postRate <= millis())
  {
    if (getFromPhant()) lastPost = millis(); //get data from Phant
    else lastPost = millis(); //Even if we fail delay whole cycle before we try again
  }
}

//function used to connect to WiFi network
void connectWiFi()
{
  byte ledStatus = LOW;
  // Set WiFi mode to station (as opposed to AP or AP_STA)
  WiFi.mode(WIFI_STA);
  // WiFI.begin([ssid], [passkey]) initiates a WiFI connection
  // to the stated [ssid], using the [passkey] as a WPA, WPA2,
  // or WEP passphrase.
  WiFi.begin(WiFiSSID, WiFiPSK);
  
  // Use the WiFi.status() function to check if the ESP8266
  // is connected to a WiFi network.
  while (WiFi.status() != WL_CONNECTED)
  {
    // Blink the LED
    digitalWrite(LED_BUILTIN, ledStatus); // Write LED high/low
    ledStatus = (ledStatus == HIGH) ? LOW : HIGH;
    
    // Delays allow the ESP8266 to perform critical tasks
    // defined outside of the sketch. These tasks include
    // setting up, and maintaining, a WiFi connection.
    delay(100);
  }
}

//function that sets up some initial hardware states
void initHardware()
{
  pinMode(light, OUTPUT); //turn light off at startup
  digitalWrite(light, LOW);
}

//function that handles getting data from phant cloud
int getFromPhant()

 //Set phant data
 Phant phant(PhantHost, gPublicKey, gPrivateKey);
  
  WiFiClient client; //Create client object to communicate with the phant server

  if (!client.connect(PhantHost, 80)) { //Attempt to connect to phant server using port 80
    // If we fail to connect, return 0.
    return 0;
  }

  //Get data from phant cloud
    client.print(phant.get()); 
    client.println();
   int cTrack = 0; //variable that tracks count to spell stamp
   bool match = false; //tracks when we have a match with "stamp" and we can then get control data
   int pCount = 0; //variable used to track when we have control data
   while(1) { //loop until we get data and server closes connection
    if (client.available()) { //if data is available from phant server
      char c = client.read(); //read a bite of data from server
      if(!match) { //if true than we have not found the word "stamp" so keep looking
        if(c == parseKey[cTrack]) //check if we have a character match with word "stamp"
        {
          if(cTrack == (sizeof(parseKey)-2)) match = true; //if true it means we found a match for "stamp" in data from phant cloud
          cTrack++; //iterate this count if a character match was found
        }
        else { //if true means no character match so reset count
          cTrack = 0;
        }
      }
      else { //if true it means we found a match to "stamp" and we are ready to get control data
        
        if(pCount == 1) { //if true we are at the point in the data to read control data for node oen
          int dControl = c - '0'; //convert char data to an int by subtract an ASCII zero
          if(dControl == 1 | dControl == 0) digitalWrite(light, dControl); //make sure data is a one or zer and set LED pin with it
        }
        pCount++; //iterate the parse counter
      }
    }

    // if the server's disconnected, stop the client:
    if (!client.connected()) {
      client.stop(); //stop client, if you don't have this you will create too many clients and server won't let you connect anymore
      break; //This is how we get out of the loop
    }
   }
  
  return 1; // Return success
}


Sunday, April 2, 2017

Home Automation with the Arduino and the Amazon Echo Part 1

In this video series we look at how to use Arduino (ESP8266) and the Amazon Echo to do voice controlled home automation.


//*******************json file for Alexa Skill*****************
{
  "intents": [
    {
      "intent": "TurnLightOn"
    },
    {
      "intent": "TurnLightOff"
    }
  ]
}

//********************java script code for Lambda Function*************************
var https = require('https') //include https

exports.handler = (event, context) => {

  try {

    if (event.session.new) {
      // New Session
      console.log("NEW SESSION") //log this for debugging
    }

    switch (event.request.type) {

      case "LaunchRequest":
        // Launch Request
        console.log(`LAUNCH REQUEST`)
        context.succeed(
          generateResponse(
            buildSpeechletResponse("Welcome to the ForceTronics Home Automation Skill, say turn light on or turn light off", true), //response for Alexa if you just call the skill without intent
            {}
          )
        )
        break;

      case "IntentRequest":
        // Intent Request
        console.log(`INTENT REQUEST`)

        switch(event.request.intent.name) { //switch statement to select the right intent
          case "TurnLightOn":
          var endpoint = "https://data.sparkfun.com/input/YourPublicKey?private_key=YourPrivateKey&lightstate=1" //https string to log data to phant phant
          https.get(endpoint, function (result) { //use https get request to send data to phant
          console.log('Success, with: ' + result.statusCode);
          context.succeed(
           generateResponse( //if you succeeded allow Alexa to tell you state of light
                buildSpeechletResponse("The light is turned on", true),
                {}
            )
          )
          }).on('error', function (err) {
            console.log('Error, with: ' + err.message);
            context.done("Failed");
          });
            break;

          case "TurnLightOff": //the turn light off intent
            var endpoint2 = "https://data.sparkfun.com/input/YourPublicKey?private_key=YourPrivateKey&lightstate=0" // phant string to set light state to off
            https.get(endpoint2, function (result) {
            console.log('Success, with: ' + result.statusCode);
            context.succeed(
                generateResponse( //Alexa response if successful
                 buildSpeechletResponse("The light is turned off", true),
                    {}
                )
            )
            }).on('error', function (err) {
            console.log('Error, with: ' + err.message);
            context.done("Failed");
            });
            break;

          default:
            throw "Invalid intent"
        }

        break;

      case "SessionEndedRequest":
        // Session Ended Request
        console.log(`SESSION ENDED REQUEST`)
        break;

      default:
        context.fail(`INVALID REQUEST TYPE: ${event.request.type}`)

    }

  } catch(error) { context.fail(`Exception: ${error}`) }

}

// builds an Alexa response
buildSpeechletResponse = (outputText, shouldEndSession) => {

  return {
    outputSpeech: {
      type: "PlainText",
      text: outputText
    },
    shouldEndSession: shouldEndSession
  }

}

//plays Alexa reponse
generateResponse = (speechletResponse, sessionAttributes) => {

  return {
    version: "1.0",
    sessionAttributes: sessionAttributes,
    response: speechletResponse
  }

}

Wednesday, November 23, 2016

Creating a Sensor Network that Connects to the Cloud Part 3

In this three part series we look at how to create a wireless sensor mesh network that stores data on the cloud using the Arduino platform. In part three we look at how to access the sensor data from the cloud with a PC or Android device.


GitHub link to access code from the series: https://github.com/ForceTronics/nRF24L01-Sensor-Network-that-Connects-to-the-Cloud/

Thursday, November 3, 2016

Creating a Sensor Network that Connects to the Cloud Part 2

In this three part series we look at how to create a wireless sensor mesh network that stores data on the cloud using the Arduino platform. In part two we look at how to add time stamps to our sensor data and track the battery state of our nodes.


GitHub: https://github.com/ForceTronics/nRF24L01-Sensor-Network-that-Connects-to-the-Cloud/tree/master

Wednesday, October 26, 2016

Creating a Sensor Network that Connects to the Cloud Part 1

In this three part series we look at how to create a wireless sensor mesh network that stores data on the cloud using the Arduino platform. In part one we will look at the architecture of the network and how to get started sending sensor data to the cloud. 


Link to GitHub library and sketch code from video https://github.com/ForceTronics/nRF24L01-Sensor-Network-that-Connects-to-the-Cloud


Monday, September 5, 2016

Combining Arduino, Android, and the Cloud Part 3

In this 3 part series we look at how to create an Android app to monitor and control multiple WiFi enabled Arduinos using the cloud. In part 3 the finale we will look at how to send control data to the cloud using an Android App to control the Arduino WiFi nodes. To download the Android App .aia file to load into MIT App Inventor II use the following link: https://dl.dropboxusercontent.com/u/26591541/CloudHomeAutoEx2.aia


//Arduino MKR1000 Code****************************************************
/*
 This sketch was created for a tutorial called Combining Arduino, Android, and the Cloud Part 3 
 That was presented on the ForceTronics YouTube Channel. This code is public domain for anybody to 
 use or modify at your own risk

 Note that this code was leveraged from the Arduino WiFi101 examples and from a Sparkfun example 
 on using their cloud service Phant
 */


#include <SPI.h>
#include <WiFi101.h>

char ssid[] = "YourNetwork"; //  your network SSID (name)
char pass[] = "YourPassword";    // your network password (use for WPA, or use as key for WEP)
int keyIndex = 0;            // your network key Index number (needed only for WEP)
bool pData = false;  //used to toggle between posting data and getting data

int status = WL_IDLE_STATUS;

//define some constant variables for pins and node number
const int LED_PIN = 6; // Thing's onboard, green LED
const int ANALOG_PIN = A0; // The only analog pin on the Thing
const int NODE_NUM = 2; //node identifier
const char parseKey[] = "stamp";

//define areas for phant cloud address and security keys
const char PhantHost[] = "data.sparkfun.com";
const char pPublicKey[] = "PublicKeyForPosting";
const char pPrivateKey[] = "PrivateKeyForPosting";
const char gPublicKey[] = "PublicKeyForGetting";
const char gPrivateKey[] = "PublicKeyForGetting";
//The following variables are from Phant library created by Sparkfun.
String _pub;
String _prv;
String _host;
String _params;
static const char HEADER_POST_URL1[] PROGMEM = "POST /input/";
static const char HEADER_POST_URL2[] PROGMEM = ".txt HTTP/1.1\n";
static const char HEADER_PHANT_PRV_KEY[] PROGMEM = "Phant-Private-Key: ";
static const char HEADER_CONNECTION_CLOSE[] PROGMEM = "Connection: close\n";
static const char HEADER_CONTENT_TYPE[] PROGMEM = "Content-Type: application/x-www-form-urlencoded\n";
static const char HEADER_CONTENT_LENGTH[] PROGMEM = "Content-Length: ";

//timing for posting to the phant cloud
const unsigned long postRate = 15000;
unsigned long lastPost = 0;

void setup() {
  pinMode(LED_PIN, OUTPUT); //setup LED pin
  digitalWrite(LED_PIN, LOW); //Turn off LED
  Serial.begin(9600);
  while (!Serial) { //Note the code will not cont unless you open serial monitor
    ; // wait for serial port to connect. Needed for native USB port only
  }

  // check for the presence of the shield:
  if (WiFi.status() == WL_NO_SHIELD) {
    Serial.println("WiFi shield not present");
    // don't continue:
    while (true);
  }

  // attempt to connect to Wifi network:
  while (status != WL_CONNECTED) {
    Serial.print("Attempting to connect to SSID: ");
    Serial.println(ssid);
    // Connect to WPA/WPA2 network. Change this line if using open or WEP network:
    status = WiFi.begin(ssid, pass);

    // wait 10 seconds for connection:
    delay(10000);
  }
  Serial.println("Connected to wifi");
  printWifiStatus(); //Print info about the WiFi network that you are connected to
}

void loop() {
  //Delay for set time then post and get data from Phant cloud
  if (lastPost + postRate <= millis())
  {
    if(pData) {
      if (postToPhant()) lastPost = millis();
      else lastPost = millis(); //Even if we fail delay whole cycle before we try again   
    } 
    else {
      if (getFromPhant()) lastPost = millis();
      else lastPost = millis(); //Even if we fail delay whole cycle before we try again 
    }
  }
}

//function that handles posting and getting data from phant cloud
int getFromPhant()

 //Set phant data
 phant(PhantHost, gPublicKey, gPrivateKey);
  
  WiFiClient client; //Create client object to communicate with the phant server

  if (!client.connect(PhantHost, 80)) { //Attempt to connect to phant server using port 80
    // If we fail to connect, return 0.
    return 0;
  }

  //Get data from phant cloud
    client.print(phantGet()); 
    client.println();
    Serial.println("sent get request.....");
   int cTrack = 0; //variable that tracks count to spell stamp
   bool match = false; //tracks when we have a match with "stamp" and we can then get control data
   int pCount = 0; //variable used to track whe we have control data
   while(1) { //loop until we get data and server closes connection
    if (client.available()) { //if data is available from phant server
      char c = client.read(); //read a bite of data from server
      if(!match) { //if true than we have not found the word "stamp" so keep looking
        if(c == parseKey[cTrack]) //check if we have a character match with word "stamp"
        {
          if(cTrack == (sizeof(parseKey)-2)) match = true; //if true it means we found a match for "stamp" in data from phant cloud
          cTrack++; //iterate this count if a character match was found
        }
        else { //if true means no character match so reset count
          cTrack = 0;
        }
      }
      else { //if true it means we found a match to "stamp" and we are ready to get control data
        
        if(pCount == 3) { //if true we are at the point in the data to read control data for node oen
          Serial.print(c);
          int dControl = c - '0'; //convert char data to an int by subtract an ASCII zero
          if(dControl == 1 | dControl == 0) digitalWrite(LED_PIN, dControl); //make sure data is a one or zer and set LED pin with it
        }
        pCount++; //iterate the parse counter
      }
    }

    // if the server's disconnected, stop the client:
    if (!client.connected()) {
      Serial.println();
      Serial.println("disconnecting.");
      client.stop(); //stop client, if you don't have this you will create too many clients and server won't let you connect anymore
      break; //This is how we get out of the loop
    }
   }
  pData = true; //set to true so we post data to cloud next loop
  return 1; // Return success
}

//function used to post data to phant cloud
int postToPhant()
{
  // Declare an object from the Phant library - phant
  phant(PhantHost, pPublicKey, pPrivateKey);
  //These calls build the web communication strings with Phant
  phantAdd("adcdata", analogRead(ANALOG_PIN)); //specify field and data used in that field
  phantAdd("wifinode", NODE_NUM);
  
  WiFiClient client; //Create client object to communicate with the phant server

  if (!client.connect(PhantHost, 80)) { //Attempt to connect to phant server using port 80
    // If we fail to connect, return 0.
    pData = false; //set to false so we get data from cloud next loop
    return 0;
  }

  //Send post to phant server
  client.print(phantPost()); 
  
  // if there are incoming bytes available
  // from the server, read them and print them:
  while (client.available()) {
    String line = client.readStringUntil('\r');
    //Do something with data
  }
  client.stop();
  pData = false; //set to false so we get data from cloud next loop
  return 1; // Return success
}

void printWifiStatus() {
  // print the SSID of the network you're attached to:
  Serial.print("SSID: ");
  Serial.println(WiFi.SSID());

  // print your WiFi shield's IP address:
  IPAddress ip = WiFi.localIP();
  Serial.print("IP Address: ");
  Serial.println(ip);

  // print the received signal strength:
  long rssi = WiFi.RSSI();
  Serial.print("signal strength (RSSI):");
  Serial.print(rssi);
  Serial.println(" dBm");
  Serial.println();
}


//This is from phant library, initializes variables
void phant(String host, String publicKey, String privateKey) {
  _host = host;
  _pub = publicKey;
  _prv = privateKey;
  _params = "";
}

//From phant library, builds string of field and data
void phantAdd(String field, int data) {

  _params += "&" + field + "=" + String(data);

}

//From phant library, builds string to get data from Phant cloud
String phantGet() {
  String result = "GET /output/" + _pub + ".csv?page=1 HTTP/1.1\n";
  result += "Host: " + _host + "\n";
  result += "Connection: close\n";

  return result;

}

//From phant library, builds the string used to post data to phant over web services
String phantPost() {

  String params = _params.substring(1);
  String result;
  //String result = "POST /input/" + _pub + ".txt HTTP/1.1\n";
  for (int i=0; i<strlen(HEADER_POST_URL1); i++)
  {
    result += (char)pgm_read_byte_near(HEADER_POST_URL1 + i);
  }
  result += _pub;
  for (int i=0; i<strlen(HEADER_POST_URL2); i++)
  {
    result += (char)pgm_read_byte_near(HEADER_POST_URL2 + i);
  }
  result += "Host: " + _host + "\n";
  //result += "Phant-Private-Key: " + _prv + "\n";
  for (int i=0; i<strlen(HEADER_PHANT_PRV_KEY); i++)
  {
    result += (char)pgm_read_byte_near(HEADER_PHANT_PRV_KEY + i);
  }
  result += _prv + '\n';
  //result += "Connection: close\n";
  for (int i=0; i<strlen(HEADER_CONNECTION_CLOSE); i++)
  {
    result += (char)pgm_read_byte_near(HEADER_CONNECTION_CLOSE + i);
  }
  //result += "Content-Type: application/x-www-form-urlencoded\n";
  for (int i=0; i<strlen(HEADER_CONTENT_TYPE); i++)
  {
    result += (char)pgm_read_byte_near(HEADER_CONTENT_TYPE + i);
  }  
  //result += "Content-Length: " + String(params.length()) + "\n\n";
  for (int i=0; i<strlen(HEADER_CONTENT_LENGTH); i++)
  {
    result += (char)pgm_read_byte_near(HEADER_CONTENT_LENGTH + i);
  } 
  result += String(params.length()) + "\n\n";
  result += params;

  _params = "";
  return result;
}

//This function convers the ADC level integer value into float voltage value.
//The inputs are the measured ADC value and the ADC reference voltage level
//The formula used was obtained from the data sheet: (ADC value / 1024) x ref voltage
float convertToVolt(float refVal, int aVAL) {
  return (((float)aVAL/1024)*refVal);
}

//this function calculates temp in F from TMP36 temp sensor
//see TMP36 datasheet to understand algorithm used
float calculateTempF(float v1) { 
 float temp = 0;
 //calculate temp in C, .75 volts is 25 C. 10mV per degree
 if (v1 < .75) { temp = 25 - ((.75-v1)/.01); } //if below 25 C
 else if (v1 == .75) {temp = 25; }
 else { temp = 25 + ((v1 -.75)/.01); } //if above 25
 //convert to F
 temp =((temp*9)/5) + 32;
 return temp;
}

//Arduino ESP8266 Code****************************************************
/*
 This sketch was created for a tutorial called Combining Arduino, Android, and the Cloud Part 3 
 That was presented on the ForceTronics YouTube Channel. This code is public domain for anybody to 
 use or modify at your own risk

 Note that this code was leveraged from a Sparkfun example 
 on using their cloud service Phant
 */

// Include the ESP8266 WiFi library. (Works a lot like the
// Arduino WiFi library.)
#include <ESP8266WiFi.h>
// Include the SparkFun Phant library.
#include <Phant.h>

//Set your network name and password
const char WiFiSSID[] = "YourNetwork";
const char WiFiPSK[] = "YourPassword";

//define constants for pin control and node number
const int LED_PIN = 5; // Thing's onboard, green LED
const int ANALOG_PIN = A0; // The only analog pin on the Thing
const int NODE_NUM = 1; //node identifier
const char parseKey[] = "stamp";
bool pData = false;  //used to toggle between posting data and getting data

//declare phant address and security keys
const char PhantHost[] = "data.sparkfun.com";
const char pPublicKey[] = "PublicKeyForPosting";
const char pPrivateKey[] = "PrivateKeyForPosting";
const char gPublicKey[] = "PublicKeyForGetting";
const char gPrivateKey[] = "PublicKeyForGetting";

//specify the rate that you post data to cloud
const unsigned long postRate = 15000;
unsigned long lastPost = 0;

void setup() 
{
  initHardware(); //setup arduino hardware
  connectWiFi(); //Connect your WiFi network
  digitalWrite(LED_PIN, HIGH);
}

void loop() 
{ //loop until it is time to post data to phant cloud
  if (lastPost + postRate <= millis())
  {
    if(pData) {
      if (postToPhant()) lastPost = millis();
      else lastPost = millis(); //Even if we fail delay whole cycle before we try again   
    } 
    else {
      if (getFromPhant()) lastPost = millis();
      else lastPost = millis(); //Even if we fail delay whole cycle before we try again 
    }
  }
}

//function used to connect to WiFi network
void connectWiFi()
{
  byte ledStatus = LOW;
  // Set WiFi mode to station (as opposed to AP or AP_STA)
  WiFi.mode(WIFI_STA);
  // WiFI.begin([ssid], [passkey]) initiates a WiFI connection
  // to the stated [ssid], using the [passkey] as a WPA, WPA2,
  // or WEP passphrase.
  WiFi.begin(WiFiSSID, WiFiPSK);
  
  // Use the WiFi.status() function to check if the ESP8266
  // is connected to a WiFi network.
  while (WiFi.status() != WL_CONNECTED)
  {
    // Blink the LED
    digitalWrite(LED_PIN, ledStatus); // Write LED high/low
    ledStatus = (ledStatus == HIGH) ? LOW : HIGH;
    
    // Delays allow the ESP8266 to perform critical tasks
    // defined outside of the sketch. These tasks include
    // setting up, and maintaining, a WiFi connection.
    delay(100);
    // Potentially infinite loops are generally dangerous.
    // Add delays -- allowing the processor to perform other
    // tasks -- wherever possible.
  }
}

//function that sets up some initial hardware states
void initHardware()
{
  Serial.begin(9600);
  pinMode(LED_PIN, OUTPUT);
  digitalWrite(LED_PIN, LOW);
}

//function that handles posting and getting data from phant cloud
int getFromPhant()

 //Set phant data
 Phant phant(PhantHost, gPublicKey, gPrivateKey);
  
  WiFiClient client; //Create client object to communicate with the phant server

  if (!client.connect(PhantHost, 80)) { //Attempt to connect to phant server using port 80
    // If we fail to connect, return 0.
    return 0;
  }

  //Get data from phant cloud
    client.print(phant.get()); 
    client.println();
   int cTrack = 0; //variable that tracks count to spell stamp
   bool match = false; //tracks when we have a match with "stamp" and we can then get control data
   int pCount = 0; //variable used to track whe we have control data
   while(1) { //loop until we get data and server closes connection
    if (client.available()) { //if data is available from phant server
      char c = client.read(); //read a bite of data from server
      if(!match) { //if true than we have not found the word "stamp" so keep looking
        if(c == parseKey[cTrack]) //check if we have a character match with word "stamp"
        {
          if(cTrack == (sizeof(parseKey)-2)) match = true; //if true it means we found a match for "stamp" in data from phant cloud
          cTrack++; //iterate this count if a character match was found
        }
        else { //if true means no character match so reset count
          cTrack = 0;
        }
      }
      else { //if true it means we found a match to "stamp" and we are ready to get control data
        
        if(pCount == 1) { //if true we are at the point in the data to read control data for node oen
          int dControl = c - '0'; //convert char data to an int by subtract an ASCII zero
          if(dControl == 1 | dControl == 0) digitalWrite(LED_PIN, dControl); //make sure data is a one or zer and set LED pin with it
        }
        pCount++; //iterate the parse counter
      }
    }

    // if the server's disconnected, stop the client:
    if (!client.connected()) {
      client.stop(); //stop client, if you don't have this you will create too many clients and server won't let you connect anymore
      break; //This is how we get out of the loop
    }
   }
  pData = true; //set to true so we post data to cloud next loop
  return 1; // Return success
}

//this function takes data and posts it to the cloud
int postToPhant()

  // Declare an object from the Phant library - phant
  Phant phant(PhantHost, pPublicKey, pPrivateKey);
  //These functions build data and field string that will be sent to phant cloud
  phant.add("adcdata", analogRead(ANALOG_PIN));
  phant.add("wifinode", NODE_NUM);
  
  // Now connect to data.sparkfun.com, and post our data:
  WiFiClient client; //declare client object that will post the data
  const int httpPort = 80; //specify port to post through
  
  if (!client.connect(PhantHost, httpPort)) //attempt to connect to phant
  {
    // If we fail to connect, return 0.
    return 0;
  }
 //Send post to phant
  client.print(phant.post());
  
  // Read all the lines of the reply from server and print them to Serial
  while(client.available()){
    String line = client.readStringUntil('\r');
    //Serial.print(line); // Trying to avoid using serial
  }
  pData = false; //set to false so we get data from cloud next loop
  return 1; // Return success
}