You can access code from GitHub: https://github.com/ForceTronics/Arduino_Echo_Home_Automation
The ForceTronics blog provides tutorials on creating fun and unique electronic projects. The goal of each project will be to create a foundation or jumping off point for amateur, hobbyist, and professional engineers to build on and innovate. Please use the comments section for questions and go to forcetronics.com for information on forcetronics consulting services.
Showing posts with label Echo. Show all posts
Tuesday, May 30, 2017
Home Automation with Arduino and the Amazon Echo Part 4
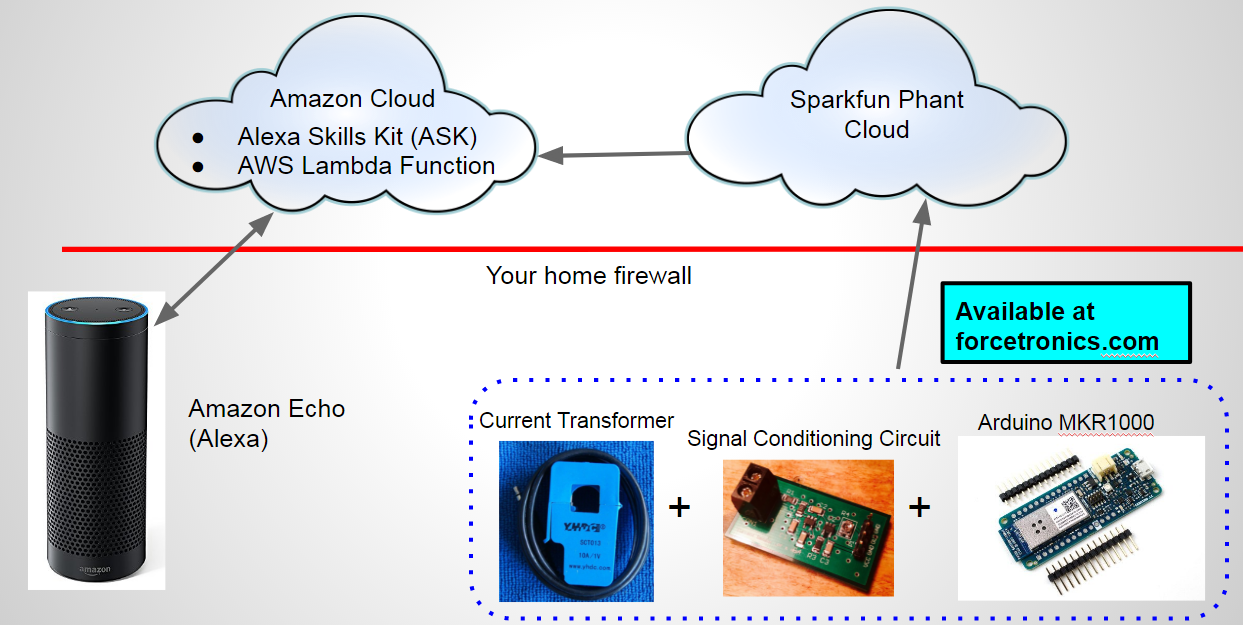
In the final conclusion of this four part series on using the Amazon Echo and Arduino for home automation we look at the Arduino hardware setup for monitoring the current consumption of a washer machine and reports its state to the cloud.
You can access code from GitHub: https://github.com/ForceTronics/Arduino_Echo_Home_Automation
Labels:
AC current,
Amazon,
arduino,
AWS,
cloud,
current transformer,
Echo,
home automation,
MKR1000,
phant,
Tutorial,
WiFi
Friday, May 26, 2017
Home Automation with the Arduino and the Amazon Echo Part 3
In part 3 instead of controlling a household device with the Echo, Arduino, and the cloud like we did in parts 1 and 2, we are monitoring an appliance (washer) so the data is flowing in the opposite direction.
You can access the code on github: https://github.com/ForceTronics/Arduino_Echo_Home_Automation
Labels:
Alexa,
Alexa skill,
arduino,
AWS,
cloud,
Echo,
home automation,
Lambda,
MKR1000,
Node JS,
phant,
skill,
Tutorial
Thursday, April 6, 2017
Home Automation with the Arduino and the Amazon Echo Part 2
In this video series we look at how to use Arduino (ESP8266) and the Amazon Echo to do voice controlled home automation.
Link to project material on GitHub: https://github.com/ForceTronics/Arduino_Echo_Home_Automation
//************************************ESP8266 Arduino code*********************
/*
This sketch was created for a video series called Home Automation with the Arduino and the Amazon Echo Part 2
That was presented on the ForceTronics YouTube Channel. This code is public domain for anybody to use or modify at your own risk
Note that this code was leveraged from a Sparkfun example on using their cloud service Phant
*/
// Include the ESP8266 WiFi library
#include <ESP8266WiFi.h>
// Include the SparkFun Phant library.
#include <Phant.h>
//Set your network name and password
const char WiFiSSID[] = "NetworkName"; //your wifi network name goes here
const char WiFiPSK[] = "NetworkPassword"; //your wifi password goes here
//define constants for pin control and node number
const int light = 4; //NodeMCU GPIO 4 pin is connected to the WiFi AC Switch control
const char parseKey[] = "stamp"; //This is used to parse through data from Phant to find light setting
//declare phant address and security keys
const char PhantHost[] = "data.sparkfun.com";
const char gPublicKey[] = "YourPublicKey"; //your phant public key goes here
const char gPrivateKey[] = "YourPrivateKey"; //your phant private key goes here
//specify the rate that you post data to cloud
const unsigned long postRate = 1000;
unsigned long lastPost = 0;
void setup()
{
initHardware(); //setup arduino hardware
connectWiFi(); //Connect your WiFi network
digitalWrite(LED_BUILTIN, HIGH); //turn on LED
}
void loop()
{ //loop until it is time to post data to phant cloud, variable "postRate" defines the interval in milli seconds
if (lastPost + postRate <= millis())
{
if (getFromPhant()) lastPost = millis(); //get data from Phant
else lastPost = millis(); //Even if we fail delay whole cycle before we try again
}
}
//function used to connect to WiFi network
void connectWiFi()
{
byte ledStatus = LOW;
// Set WiFi mode to station (as opposed to AP or AP_STA)
WiFi.mode(WIFI_STA);
// WiFI.begin([ssid], [passkey]) initiates a WiFI connection
// to the stated [ssid], using the [passkey] as a WPA, WPA2,
// or WEP passphrase.
WiFi.begin(WiFiSSID, WiFiPSK);
// Use the WiFi.status() function to check if the ESP8266
// is connected to a WiFi network.
while (WiFi.status() != WL_CONNECTED)
{
// Blink the LED
digitalWrite(LED_BUILTIN, ledStatus); // Write LED high/low
ledStatus = (ledStatus == HIGH) ? LOW : HIGH;
// Delays allow the ESP8266 to perform critical tasks
// defined outside of the sketch. These tasks include
// setting up, and maintaining, a WiFi connection.
delay(100);
}
}
//function that sets up some initial hardware states
void initHardware()
{
pinMode(light, OUTPUT); //turn light off at startup
digitalWrite(light, LOW);
}
//function that handles getting data from phant cloud
int getFromPhant()
{
//Set phant data
Phant phant(PhantHost, gPublicKey, gPrivateKey);
WiFiClient client; //Create client object to communicate with the phant server
if (!client.connect(PhantHost, 80)) { //Attempt to connect to phant server using port 80
// If we fail to connect, return 0.
return 0;
}
//Get data from phant cloud
client.print(phant.get());
client.println();
int cTrack = 0; //variable that tracks count to spell stamp
bool match = false; //tracks when we have a match with "stamp" and we can then get control data
int pCount = 0; //variable used to track when we have control data
while(1) { //loop until we get data and server closes connection
if (client.available()) { //if data is available from phant server
char c = client.read(); //read a bite of data from server
if(!match) { //if true than we have not found the word "stamp" so keep looking
if(c == parseKey[cTrack]) //check if we have a character match with word "stamp"
{
if(cTrack == (sizeof(parseKey)-2)) match = true; //if true it means we found a match for "stamp" in data from phant cloud
cTrack++; //iterate this count if a character match was found
}
else { //if true means no character match so reset count
cTrack = 0;
}
}
else { //if true it means we found a match to "stamp" and we are ready to get control data
if(pCount == 1) { //if true we are at the point in the data to read control data for node oen
int dControl = c - '0'; //convert char data to an int by subtract an ASCII zero
if(dControl == 1 | dControl == 0) digitalWrite(light, dControl); //make sure data is a one or zer and set LED pin with it
}
pCount++; //iterate the parse counter
}
}
// if the server's disconnected, stop the client:
if (!client.connected()) {
client.stop(); //stop client, if you don't have this you will create too many clients and server won't let you connect anymore
break; //This is how we get out of the loop
}
}
return 1; // Return success
}
Labels:
Alexa,
Amazon,
arduino,
cloud,
Echo,
ESP8266,
home automation,
IoT,
NodeMCU,
phant,
Tutorial,
WiFi
Sunday, April 2, 2017
Home Automation with the Arduino and the Amazon Echo Part 1
In this video series we look at how to use Arduino (ESP8266) and the Amazon Echo to do voice controlled home automation.
//*******************json file for Alexa Skill*****************
{
"intents": [
{
"intent": "TurnLightOn"
},
{
"intent": "TurnLightOff"
}
]
}
//********************java script code for Lambda Function*************************
var https = require('https') //include https
exports.handler = (event, context) => {
try {
if (event.session.new) {
// New Session
console.log("NEW SESSION") //log this for debugging
}
switch (event.request.type) {
case "LaunchRequest":
// Launch Request
console.log(`LAUNCH REQUEST`)
context.succeed(
generateResponse(
buildSpeechletResponse("Welcome to the ForceTronics Home Automation Skill, say turn light on or turn light off", true), //response for Alexa if you just call the skill without intent
{}
)
)
break;
case "IntentRequest":
// Intent Request
console.log(`INTENT REQUEST`)
switch(event.request.intent.name) { //switch statement to select the right intent
case "TurnLightOn":
var endpoint = "https://data.sparkfun.com/input/YourPublicKey?private_key=YourPrivateKey&lightstate=1" //https string to log data to phant phant
https.get(endpoint, function (result) { //use https get request to send data to phant
console.log('Success, with: ' + result.statusCode);
context.succeed(
generateResponse( //if you succeeded allow Alexa to tell you state of light
buildSpeechletResponse("The light is turned on", true),
{}
)
)
}).on('error', function (err) {
console.log('Error, with: ' + err.message);
context.done("Failed");
});
break;
case "TurnLightOff": //the turn light off intent
var endpoint2 = "https://data.sparkfun.com/input/YourPublicKey?private_key=YourPrivateKey&lightstate=0" // phant string to set light state to off
https.get(endpoint2, function (result) {
console.log('Success, with: ' + result.statusCode);
context.succeed(
generateResponse( //Alexa response if successful
buildSpeechletResponse("The light is turned off", true),
{}
)
)
}).on('error', function (err) {
console.log('Error, with: ' + err.message);
context.done("Failed");
});
break;
default:
throw "Invalid intent"
}
break;
case "SessionEndedRequest":
// Session Ended Request
console.log(`SESSION ENDED REQUEST`)
break;
default:
context.fail(`INVALID REQUEST TYPE: ${event.request.type}`)
}
} catch(error) { context.fail(`Exception: ${error}`) }
}
// builds an Alexa response
buildSpeechletResponse = (outputText, shouldEndSession) => {
return {
outputSpeech: {
type: "PlainText",
text: outputText
},
shouldEndSession: shouldEndSession
}
}
//plays Alexa reponse
generateResponse = (speechletResponse, sessionAttributes) => {
return {
version: "1.0",
sessionAttributes: sessionAttributes,
response: speechletResponse
}
}
Subscribe to:
Posts (Atom)