The ForceTronics blog provides tutorials on creating fun and unique electronic projects. The goal of each project will be to create a foundation or jumping off point for amateur, hobbyist, and professional engineers to build on and innovate. Please use the comments section for questions and go to forcetronics.com for information on forcetronics consulting services.
This is part 2 of the Smart Thermostat project. In part 2 we add the following features to our thermostat design:
Bluetooth control so the thermostat can be controlled remotely so you can control the temperature of your home from the comfort of your couch or bed
Mount the project so it is in a much more usable and aesthetically pleasing form then the prototype form it we saw in part 1
A power save mode to cut down on the utility costs
In part three we will create the Android app and add a power supply to run it off of the 24 VAC signal coming from the HVAC system. To download the Arduino code follow the GitHub link below. Please share your comments!
In this video we look at how to get started with the HC-06 Bluetooth transceiver module. The HC-06 is a great low cost way to add wireless communication to any project. Since the HC-06 uses a serial line to communicate it is easy to pair it with an Arduino.
In this project we will build a smart thermostat with features such as high accuracy temperature measurements, customized user interface, and, best of all, wireless control from an Android device. Since this is a big project it will be presented in three parts. This is part one where we will cover the basic design and get to a working prototype. To download the Arduino code follow the GitHub link below. Please share your comments!
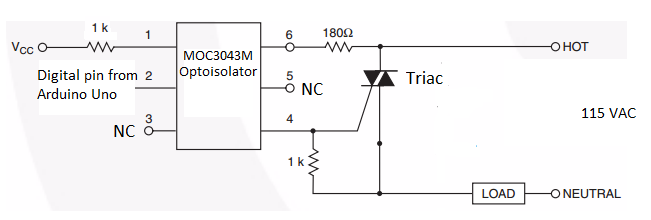
In this video we look at how to use a Thyristor (TRIAC) as an AC line power switch. Great tool to use in home automation projects for turning on or off a light or building your own thermostat.
Thyristor Example Circuit
//This sketch is used to control Thyristor that is used as a switch to turn on and off an AC line powered light. //This code is free for all to use int8_t dig = 1; //default is high for light off void setup() { //for controlling Thyristor pinMode(3, OUTPUT); //set pin to output so it can sink current from optoisolator digitalWrite(3, HIGH); //when high the thyristor is off or open } void loop() { delay(2000); //light turns on / off every 2 seconds togLight(); //call function to turn light on / off using digital pin } void togLight() { if(dig) { digitalWrite(3, HIGH); //turn off light dig = 0; //toggle dig value } else { digitalWrite(3, LOW); //turn light on dig = 1; } }
In this post we build a remote control car using Arduino, Bluetooth, and an Android device. The Android device serves as the controller. One cool factor of this project is our Android app uses the position of the Android device to control the car!
RC Car Schematic
/* This sketch is for a remote controlled car with four electric motors that uses the Arduino Uno, RN42 Bluetooth module, and an Adafruit Motorshield. This code is free for anybody to use or modify */ #include <Wire.h> //needed for motors and motor shield #include <Adafruit_MotorShield.h> //needed for motors and motor shield #include "utility/Adafruit_PWMServoDriver.h" //needed for motors and motor shield #include <ctype.h> int con = 0; //global variable to track connection status // Create the motor shield object with the default I2C address Adafruit_MotorShield AFMS = Adafruit_MotorShield(); // create an object for each motor and assign it to a port on the shield Adafruit_DCMotor *M1 = AFMS.getMotor(1); Adafruit_DCMotor *M2 = AFMS.getMotor(2); Adafruit_DCMotor *M3 = AFMS.getMotor(3); Adafruit_DCMotor *M4 = AFMS.getMotor(4); int count = 0; //counts how long its been since comms from joystick String uDSpeed = "500"; //create global variables to hold speed and direction info String lRSpeed = "500"; //defulat is 500 because that is stop condition //setup code only executed once void setup() { Serial.begin(115200); //start serial commm //This loop runs until a connection from another RN42 is complete and a "#" is recieved from the car //The joystick RN42 is the slave while(!con) { if((char)Serial.read() == '#') { con = 1; }//once connected change "con" to true delay(5); }
AFMS.begin(); //Start motor shield object, create with the default frequency 1.6KHz } void loop() { //check if a full speed / direction frame is ready to be read if(Serial.available() >= 6) { String temp; //temperary string to hold incoming data char c = (char)Serial.read(); if(c == 'u') { //If a 'u' was read this is start of an up / down data frame for(int i=0; i<5; i++) { //loop to read 5 other bytes of frame if(i < 4) { //reads the speed portion of frame into string temp += (char)Serial.read(); } else { //look for end of frame 'd' character, if it is there save this reading as new speed if((char)Serial.read() == 'd') { uDSpeed = temp; count = 0; //just got speed so reset count } } } } else if(c == 'l') { //If a 'l' was read this is start of an left / right data frame for(int i=0; i<5; i++) { //following code is the same as above except for direction frame if(i < 4) { temp += (char)Serial.read(); } else { if((char)Serial.read() == 'r') { lRSpeed = temp; count = 0; //just got speed so reset count } } } } } delay(1); //the following code will stop the car if no comms with joystick for 150ms count++; if(count > 20) { setMotorSpeed(500,500); } //function call to set motor speeds setMotorSpeed(uDSpeed.toInt(),lRSpeed.toInt()); } //This function clears all bytes out of arduino serial read buffer void clearSerialBuf() { while(Serial.available()) { Serial.read(); } } //This function uses the ADC values from the joystick and turns them into motor speeds for going //forware, right, left, and reverse. Inputs are the left/right and up/down joystick axis void setMotorSpeed(int upDown, int leftRight) { int lR = 0; int bF = 0; //If left/right is 500 no turn if(leftRight == 500) { lR = 0; } else if(leftRight > 500) { //If greater than 500 this is a right turn lR = 1; leftRight = leftRight - 500; } else { //less than 500 this is a left turn lR = 2; leftRight = 500 - leftRight; } if(upDown == 500) { //500 no up/down direction bF = 0; } else if(upDown > 500) {//more than 500 go forward bF = 1; upDown = upDown - 500; } else { //less than 500 go backward bF = 2; upDown = 500 - upDown; } //If direction variables are both 0 the car is stopped if(lR == 0 && bF == 0) { motorStop(); } else if (bF==1) { //if forward variable is true if(lR == 0) { //no turn so go straight forward goForward(scaleSpeed(upDown)); } else if(lR == 1) { //go forward and right goTurn(scaleSpeed(scaleTurn(upDown,leftRight)), scaleSpeed(upDown), 1); } else { //go forward and left goTurn(scaleSpeed(upDown),scaleSpeed(scaleTurn(upDown,leftRight)), 1); } } else if (bF==2) { //if backwards variable is true if(lR == 0) { //go straight backwards goBackward(scaleSpeed(upDown)); } else if(lR == 1) { //go backward and right goTurn(scaleSpeed(scaleTurn(upDown,leftRight)), scaleSpeed(upDown), 0); } else { //go backward and left goTurn(scaleSpeed(upDown),scaleSpeed(scaleTurn(upDown,leftRight)), 0); } } else { //if no forward or back then just turn if(lR==1) { //Right turn, left wheels forward and right wheels backwards goRight(scaleSpeed(leftRight)); } else { //left turn, right wheels forward and left wheels backwards goLeft(scaleSpeed(leftRight)); } } } //function to stop the motors void motorStop() { M2->run(RELEASE); M4->run(RELEASE); M1->run(RELEASE); M3->run(RELEASE); } //function to tell motors to go forward, input is speed void goForward(int mSpeed) { M1->setSpeed(mSpeed); M2->setSpeed(mSpeed); M3->setSpeed(mSpeed); M4->setSpeed(mSpeed); M2->run(FORWARD); M4->run(FORWARD); M1->run(FORWARD); M3->run(FORWARD); } //function to tell motors to go backward, input is speed void goBackward(int mSpeed) { M1->setSpeed(mSpeed); M2->setSpeed(mSpeed); M3->setSpeed(mSpeed); M4->setSpeed(mSpeed); M2->run(BACKWARD); M4->run(BACKWARD); M1->run(BACKWARD); M3->run(BACKWARD); } //function for left or right turn. inputs are speed for left tires and speed for right tires //and whether we are going forward or backwards void goTurn(int rTire, int lTire, int forward) { M1->setSpeed(rTire); M2->setSpeed(lTire); M3->setSpeed(rTire); M4->setSpeed(lTire); //code to turn Right if(forward) { M2->run(FORWARD); //M2 and M4 are left tires M4->run(FORWARD); M1->run(FORWARD); //M1 and M3 are right tires M3->run(FORWARD); } else { M2->run(BACKWARD); M4->run(BACKWARD); M1->run(BACKWARD); M3->run(BACKWARD); } } //right turn function, no forward or backwards motion void goRight(int tSpeed) { tSpeed = tSpeed - (tSpeed*.2); //reduce speed by 20% M1->setSpeed(tSpeed); M2->setSpeed(tSpeed); M3->setSpeed(tSpeed); M4->setSpeed(tSpeed); //code to turn Right M2->run(FORWARD); //left tires M4->run(FORWARD); M1->run(BACKWARD); //right tires M3->run(BACKWARD); } //left turn function, no forward or backwards motion void goLeft(int tSpeed) { tSpeed = tSpeed - (tSpeed*.2); //reduce speed by 20% M1->setSpeed(tSpeed); M2->setSpeed(tSpeed); M3->setSpeed(tSpeed); M4->setSpeed(tSpeed); //code to turn Right M2->run(BACKWARD); //left tires M4->run(BACKWARD); M1->run(FORWARD); //right tires M3->run(FORWARD); } //This function scales the speed values from the joystick ADCs to the speed values of the motors int scaleSpeed(int scale) { float r = ((float)scale/500)*250; return int(r); } //This scales the turns based on the forward / backward speeds int scaleTurn(int fBSp, int lRSp) { float r =(float)fBSp*(1 - (float)lRSp/500); return int(r); }
In this post we build a remote control car and controller / joystick using Bluetooth for communication and Arduino for control. A fun project for all ages! At the end of the post you will find the code and schematics shown in the video.
Bluetooth RC Car Schematics
/* This sketch is for a remote controlled car with four electric motors that uses the Arduino Uno, RN42 Bluetooth module, and an Adafruit Motorshield. This code is free for anybody to use or modify */ #include <Wire.h> //needed for motors and motor shield #include <Adafruit_MotorShield.h> //needed for motors and motor shield #include "utility/Adafruit_PWMServoDriver.h" //needed for motors and motor shield #include <ctype.h> int con = 0; //global variable to track connection status // Create the motor shield object with the default I2C address Adafruit_MotorShield AFMS = Adafruit_MotorShield(); // create an object for each motor and assign it to a port on the shield Adafruit_DCMotor *M1 = AFMS.getMotor(1); Adafruit_DCMotor *M2 = AFMS.getMotor(2); Adafruit_DCMotor *M3 = AFMS.getMotor(3); Adafruit_DCMotor *M4 = AFMS.getMotor(4); int count = 0; //counts how long its been since comms from joystick String uDSpeed = "500"; //create global variables to hold speed and direction info String lRSpeed = "500"; //defulat is 500 because that is stop condition //setup code only executed once void setup() { Serial.begin(115200); //start serial comm delay(1000); //delay for serial comm to start up do //do while loop for putting RN42 module into command mode { clearSerialBuf(); //empty serial read buffer Serial.print("$$$"); //but BT module in command mode delay(1000); //Wait for module to enter command mode } while ((char)Serial.read() != 'C'); //look for C from CMD response to confirm in command mode clearSerialBuf(); //empty serial read buffer while(!con) { //Connect to bluetooth device and keep trying until successful connectBT("0006666741AD"); //call function to connect, address is hardcoded, if connection is succesful "con" is set clearSerialBuf(); //empty serial buffer delay(4000); //delay after connect }
Serial.print('#'); //Send this to tell joystick that we are connected, this will cause the joystick to exit setup code
AFMS.begin(); //Start motor shield object, create with the default frequency 1.6KHz } void loop() { //check if a full speed / direction frame is ready to be read if(Serial.available() >= 6) { String temp; //temperary string to hold incoming data char c = (char)Serial.read(); if(c == 'u') { //If a 'u' was read this is start of an up / down data frame for(int i=0; i<5; i++) { //loop to read 5 other bytes of frame if(i < 4) { //reads the speed portion of frame into string temp += (char)Serial.read(); } else { //look for end of frame 'd' character, if it is there save this reading as new speed if((char)Serial.read() == 'd') { uDSpeed = temp; count = 0; //just got speed so reset count } } } } else if(c == 'l') { //If a 'l' was read this is start of an left / right data frame for(int i=0; i<5; i++) { //following code is the same as above except for direction frame if(i < 4) { temp += (char)Serial.read(); } else { if((char)Serial.read() == 'r') { lRSpeed = temp; count = 0; //just got speed so reset count } } } } } delay(1); //the following code will stop the car if no comms with joystick for 150ms count++; if(count > 20) { setMotorSpeed(500,500); } //function call to set motor speeds setMotorSpeed(uDSpeed.toInt(),lRSpeed.toInt()); } //This function connects with a BT module. Input is the device's address //If the connection is successful void connectBT(String address) { //module is in command mode send action command to connect with to address Serial.print("C," + address + "\r"); //successful response to connection command //TRYING //%CONNECT,0006666741AD,0 int done = 0; //variable to track when connection response is recieved while(!done) { //wait for reply, read it and set connection variable accordingly if(Serial.available()) { //if data is ready to be read char c = (char)Serial.read(); if(c=='%') { //this is variable set in RN42 firmware for connection response if((char)Serial.read() == 'C') { //if followed by 'C' connection was successful con = 1; //set connection variable done = 1; //we can exit loop } else { //if not a C then connection failed con = 0; //not connected done = 1; //exit loop } } else if(c == 'f') { //if this is an 'f' connection failed con = 0; done = 1; } else { } //do nothing } delay(50); //delay before running loop again } } //This function clears all bytes out of arduino serial read buffer void clearSerialBuf() { while(Serial.available()) { Serial.read(); } } //This function uses the ADC values from the joystick and turns them into motor speeds for going //forware, right, left, and reverse. Inputs are the left/right and up/down joystick axis void setMotorSpeed(int upDown, int leftRight) { int lR = 0; int bF = 0; //If left/right is 500 no turn if(leftRight == 500) { lR = 0; } else if(leftRight > 500) { //If greater than 500 this is a right turn lR = 1; leftRight = leftRight - 500; } else { //less than 500 this is a left turn lR = 2; leftRight = 500 - leftRight; } if(upDown == 500) { //500 no up/down direction bF = 0; } else if(upDown > 500) {//more than 500 go forward bF = 1; upDown = upDown - 500; } else { //less than 500 go backward bF = 2; upDown = 500 - upDown; } //If direction variables are both 0 the car is stopped if(lR == 0 && bF == 0) { motorStop(); } else if (bF==1) { //if forward variable is true if(lR == 0) { //no turn so go straight forward goForward(scaleSpeed(upDown)); } else if(lR == 1) { //go forward and right goTurn(scaleSpeed(scaleTurn(upDown,leftRight)), scaleSpeed(upDown), 1); } else { //go forward and left goTurn(scaleSpeed(upDown),scaleSpeed(scaleTurn(upDown,leftRight)), 1); } } else if (bF==2) { //if backwards variable is true if(lR == 0) { //go straight backwards goBackward(scaleSpeed(upDown)); } else if(lR == 1) { //go backward and right goTurn(scaleSpeed(scaleTurn(upDown,leftRight)), scaleSpeed(upDown), 0); } else { //go backward and left goTurn(scaleSpeed(upDown),scaleSpeed(scaleTurn(upDown,leftRight)), 0); } } else { //if no forward or back then just turn if(lR==1) { //Right turn, left wheels forward and right wheels backwards goRight(scaleSpeed(leftRight)); } else { //left turn, right wheels forward and left wheels backwards goLeft(scaleSpeed(leftRight)); } } } //function to stop the motors void motorStop() { M2->run(RELEASE); M4->run(RELEASE); M1->run(RELEASE); M3->run(RELEASE); } //function to tell motors to go forward, input is speed void goForward(int mSpeed) { M1->setSpeed(mSpeed); M2->setSpeed(mSpeed); M3->setSpeed(mSpeed); M4->setSpeed(mSpeed); M2->run(FORWARD); M4->run(FORWARD); M1->run(FORWARD); M3->run(FORWARD); } //function to tell motors to go backward, input is speed void goBackward(int mSpeed) { M1->setSpeed(mSpeed); M2->setSpeed(mSpeed); M3->setSpeed(mSpeed); M4->setSpeed(mSpeed); M2->run(BACKWARD); M4->run(BACKWARD); M1->run(BACKWARD); M3->run(BACKWARD); } //function for left or right turn. inputs are speed for left tires and speed for right tires //and whether we are going forward or backwards void goTurn(int rTire, int lTire, int forward) { M1->setSpeed(rTire); M2->setSpeed(lTire); M3->setSpeed(rTire); M4->setSpeed(lTire); //code to turn Right if(forward) { M2->run(FORWARD); //M2 and M4 are left tires M4->run(FORWARD); M1->run(FORWARD); //M1 and M3 are right tires M3->run(FORWARD); } else { M2->run(BACKWARD); M4->run(BACKWARD); M1->run(BACKWARD); M3->run(BACKWARD); } } //right turn function, no forward or backwards motion void goRight(int tSpeed) { M1->setSpeed(tSpeed); M2->setSpeed(tSpeed); M3->setSpeed(tSpeed); M4->setSpeed(tSpeed); //code to turn Right M2->run(FORWARD); //left tires M4->run(FORWARD); M1->run(BACKWARD); //right tires M3->run(BACKWARD); } //left turn function, no forward or backwards motion void goLeft(int tSpeed) { M1->setSpeed(tSpeed); M2->setSpeed(tSpeed); M3->setSpeed(tSpeed); M4->setSpeed(tSpeed); //code to turn Right M2->run(BACKWARD); //left tires M4->run(BACKWARD); M1->run(FORWARD); //right tires M3->run(FORWARD); } //This function scales the speed values from the joystick ADCs to the speed values of the motors int scaleSpeed(int scale) { float r = ((float)scale/500)*250; return int(r); } //This scales the turns based on the forward / backward speeds int scaleTurn(int fBSp, int lRSp) { float r =(float)fBSp*(1 - (float)lRSp/500); return int(r); }
Bluetooth Joystick
/*This arduino sketch is for a joystick for controller an RC car. The joystick is Parallax 2 axis joystick. The RN42 Bluetooth module is used to communicate with the RC car. This code is free for anybody to use or modify*/ int UD = 500; //Variable for storing up / down joystick axis for forward / reverse speed int LR = 500; //Variable for storing left / right joystick axis reading for direction int con = 0; //Variable to track if RN42 is connected void setup() { Serial.begin(115200); //start serial commm //This loop runs until a connection from another RN42 is complete and a "#" is recieved from the car //The joystick RN42 is the slave while(!con) { if((char)Serial.read() == '#') { con = 1; }//once connected change "con" to true delay(5); } } void loop() { UD = filter(analogRead(A0)); //Read up / down joystick axis value, apply filter, and store result LR = filter(analogRead(A1)); //Read left / right joystick axis value, apply filter, and store result Serial.print(formatValue(UD,1)); //format up / down axis value into packet and send it to RC car delay(7); Serial.print(formatValue(LR,0)); //format left / right axis value into packet and send it to RC car delay(7); } //This function sets joystick resting axis values to a consistent value (500) for both axis. It also //keeps extreme values in a consistent range int filter(int jRead) { if(jRead > 485 && jRead < 540) { return 500; } else if(jRead < 20) { return 0; } else if(jRead > 1000) {return 1000; } else { return jRead; } } //This function creates the up / down and left / right packets for RC car to read. //It makes every value four digits and adds a starting and ending character for each packet //The input is the speed or direction value and packet type (speed or direction) String formatValue(int val, int udlr) { String temp; if(val < 10) { //if below 10 add three leading zeros temp = "000" + (String)val; } else if (val < 100) { //if below 100 add two leading zeros temp = "00" + (String)val; } else if (val < 1000) { //if below 1000 add one leading zero temp = "0" + (String)val; } else { temp = (String)val; } //if 1000 add no zeros if(udlr) { //for speed packet add 'u' to front and 'd' to back temp = 'u' + temp + 'd'; } else { //for direction packet add 'l' to front and 'r' to back temp = 'l' + temp + 'r'; } return temp; }
In this video post tutorial we go over the basics of using the RN42 Bluetooth module. This tiny but capable Bluetooth module makes it easy to add wireless capability to any project or design. Topics covered include:
Connecting to and communicating with the RN42 wirelessly
Using the RN42 in command mode to change settings
Wireless communication with an Arduino Uno using the RN42
RN42 Tutorial Schematics
Basic Setup with Serial Pins Shorted Together
RN42 Connected to Arduino Uno
Communicating with an Arduino wirelessly using the RN42 Bluetooth module
/*This Arduino Uno sketch was used to communicate with an Arduino Uno wirelessly using a serial terminal and the RN42 Bluetooth module. This code is free and open for anyone to use*/
void setup() { //set baud rate to match BT module Serial.begin(115200); }
void loop() {
String t; //string to hold data from BT module while(Serial.available()) { //keep reading bytes while they are still more in the buffer t += (char)Serial.read(); //read byte, convert to char, and append it to string }
if(t.length()) { //if string is not empty do the following
if(t == "Hi Uno\r\n") { Serial.print("Hello Neil\n"); } //say hello else if(t == "Meaning of life?\r\n") { //find out the meaning of life delay(1000); Serial.print("Money. "); delay(1000); Serial.print("Guns. "); delay(1000); Serial.print("Hoes.\n"); } else { Serial.print("Syntax Error\n"); } //send this for any other string } delay(20);