Sunday, June 1, 2014

Switching AC Line Power with a Thyristor (TRIAC)

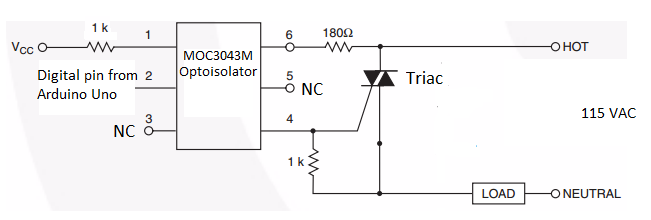
In this video we look at how to use a Thyristor (TRIAC) as an AC line power switch. Great tool to use in home automation projects for turning on or off a light or building your own thermostat.


Thyristor Example Circuit


//This sketch is used to control Thyristor that is used as a switch to turn on and off an AC line powered light. //This code is free for all to use
int8_t dig = 1; //default is high for light off

void setup() {
  //for controlling Thyristor
  pinMode(3, OUTPUT); //set pin to output so it can sink current from optoisolator
  digitalWrite(3, HIGH); //when high the thyristor is off or open
}

void loop() {
  delay(2000); //light turns on / off every 2 seconds
  togLight(); //call function to turn light on / off using digital pin
}

void togLight() {
  if(dig) { 
     digitalWrite(3, HIGH); //turn off light
     dig = 0; //toggle dig value
  }
  else {  
     digitalWrite(3, LOW); //turn light on
     dig = 1; 
   }
}


Sunday, May 11, 2014

Android / Arduino Remote Control Car

In this post we build a remote control car using Arduino, Bluetooth, and an Android device. The Android device serves as the controller. One cool factor of this project is our Android app uses the position of the Android device to control the car!


RC Car Schematic
/* This sketch is for a remote controlled car with four electric motors that uses the Arduino Uno, RN42 Bluetooth module, and an
Adafruit Motorshield. This code is free for anybody to use or modify
*/

#include <Wire.h> //needed for motors and motor shield
#include <Adafruit_MotorShield.h> //needed for motors and motor shield
#include "utility/Adafruit_PWMServoDriver.h" //needed for motors and motor shield
#include <ctype.h>

int con = 0; //global variable to track connection status
// Create the motor shield object with the default I2C address
Adafruit_MotorShield AFMS = Adafruit_MotorShield(); 
// create an object for each motor and assign it to a port on the shield 
Adafruit_DCMotor *M1 = AFMS.getMotor(1);
Adafruit_DCMotor *M2 = AFMS.getMotor(2);
Adafruit_DCMotor *M3 = AFMS.getMotor(3);
Adafruit_DCMotor *M4 = AFMS.getMotor(4);
int count = 0; //counts how long its been since comms from joystick
 String uDSpeed = "500"; //create global variables to hold speed and direction info
 String lRSpeed = "500"; //defulat is 500 because that is stop condition

//setup code only executed once
void setup() {
  Serial.begin(115200); //start serial commm
  
  //This loop runs until a connection from another RN42 is complete and a "#" is recieved from the car
  //The joystick RN42 is the slave
  while(!con) { 
    if((char)Serial.read() == '#') { con = 1; }//once connected change "con" to true
    delay(5);
  }

 AFMS.begin();  //Start motor shield object, create with the default frequency 1.6KHz


void loop() {
  
  //check if a full speed / direction frame is ready to be read
  if(Serial.available() >= 6) {
    String temp; //temperary string to hold incoming data
    char c = (char)Serial.read();
    if(c == 'u') { //If a 'u' was read this is start of an up / down data frame
      for(int i=0; i<5; i++) { //loop to read 5 other bytes of frame
        if(i < 4) { //reads the speed portion of frame into string 
          temp += (char)Serial.read();
        }
        else { //look for end of frame 'd' character, if it is there save this reading as new speed
          if((char)Serial.read() == 'd') { 
           uDSpeed = temp; 
           count = 0; //just got speed so reset count
          }
        }
      }
    }
    else if(c == 'l') { //If a 'l' was read this is start of an left / right data frame
      for(int i=0; i<5; i++) { //following code is the same as above except for direction frame
        if(i < 4) {
          temp += (char)Serial.read();
        }
        else {
          if((char)Serial.read() == 'r') { 
           lRSpeed = temp; 
           count = 0; //just got speed so reset count
          }
        }
      }
    }
  }
  
  delay(1);
  //the following code will stop the car if no comms with joystick for 150ms
  count++;
  if(count > 20) {
    setMotorSpeed(500,500);
  }
  
  //function call to set motor speeds
  setMotorSpeed(uDSpeed.toInt(),lRSpeed.toInt());
}

//This function clears all bytes out of arduino serial read buffer
void clearSerialBuf() {
 while(Serial.available()) { Serial.read(); }
}

//This function uses the ADC values from the joystick and turns them into motor speeds for going 
//forware, right, left, and reverse. Inputs are the left/right and up/down joystick axis
void setMotorSpeed(int upDown, int leftRight) {
  int lR = 0;
  int bF = 0;
  
  //If left/right is 500 no turn 
  if(leftRight == 500) {
    lR = 0;
  }
   else if(leftRight > 500) { //If greater than 500 this is a right turn
     lR = 1;
     leftRight = leftRight - 500;
   }
   else { //less than 500 this is a left turn
     lR = 2;
     leftRight = 500 - leftRight;
   }
   
   if(upDown == 500) { //500 no up/down direction
      bF = 0;
   }
   else if(upDown > 500) {//more than 500 go forward
     bF = 1;
     upDown = upDown - 500;
   }
   else { //less than 500 go backward
     bF = 2;
     upDown = 500 - upDown;
   }
   
   //If direction variables are both 0 the car is stopped
   if(lR == 0 && bF == 0) {
     motorStop();
   }
   else if (bF==1) { //if forward variable is true
     if(lR == 0) { //no turn so go straight forward
       goForward(scaleSpeed(upDown));
     }
     else if(lR == 1) { //go forward and right
       goTurn(scaleSpeed(scaleTurn(upDown,leftRight)), scaleSpeed(upDown), 1);
     }
     else { //go forward and left
       goTurn(scaleSpeed(upDown),scaleSpeed(scaleTurn(upDown,leftRight)), 1);
     }
   }
   else if (bF==2) { //if backwards variable is true
     if(lR == 0) { //go straight backwards
       goBackward(scaleSpeed(upDown));
     }
     else if(lR == 1) { //go backward and right
       goTurn(scaleSpeed(scaleTurn(upDown,leftRight)), scaleSpeed(upDown), 0);
     }
     else { //go backward and left
       goTurn(scaleSpeed(upDown),scaleSpeed(scaleTurn(upDown,leftRight)), 0);
     }
   }
   else { //if no forward or back then just turn
     if(lR==1) { //Right turn, left wheels forward and right wheels backwards
       goRight(scaleSpeed(leftRight));
     }
     else { //left turn, right wheels forward and left wheels backwards
       goLeft(scaleSpeed(leftRight));
     }
   }
}

//function to stop the motors
void motorStop() {
  M2->run(RELEASE);
  M4->run(RELEASE);
  M1->run(RELEASE);
  M3->run(RELEASE);
}

//function to tell motors to go forward, input is speed
void goForward(int mSpeed) {
  M1->setSpeed(mSpeed);
  M2->setSpeed(mSpeed);
  M3->setSpeed(mSpeed);
  M4->setSpeed(mSpeed);
  M2->run(FORWARD);
  M4->run(FORWARD);
  M1->run(FORWARD);
  M3->run(FORWARD);
}

//function to tell motors to go backward, input is speed
void goBackward(int mSpeed) {
  M1->setSpeed(mSpeed);
  M2->setSpeed(mSpeed);
  M3->setSpeed(mSpeed);
  M4->setSpeed(mSpeed);
  M2->run(BACKWARD);
  M4->run(BACKWARD);
  M1->run(BACKWARD);
  M3->run(BACKWARD);
}


//function for left or right turn. inputs are speed for left tires and speed for right tires
//and whether we are going forward or backwards
void goTurn(int rTire, int lTire, int forward) {
  
  M1->setSpeed(rTire);
  M2->setSpeed(lTire);
  M3->setSpeed(rTire);
  M4->setSpeed(lTire);
   //code to turn Right
  if(forward) {
    M2->run(FORWARD); //M2 and M4 are left tires
    M4->run(FORWARD);
    M1->run(FORWARD); //M1 and M3 are right tires
    M3->run(FORWARD);
  }
  else {
    M2->run(BACKWARD);
    M4->run(BACKWARD);
    M1->run(BACKWARD);
    M3->run(BACKWARD);
  }
}

//right turn function, no forward or backwards motion
void goRight(int tSpeed) {
  tSpeed = tSpeed - (tSpeed*.2); //reduce speed by 20%
  M1->setSpeed(tSpeed);
  M2->setSpeed(tSpeed);
  M3->setSpeed(tSpeed);
  M4->setSpeed(tSpeed);
   //code to turn Right
  M2->run(FORWARD); //left tires
  M4->run(FORWARD);
  M1->run(BACKWARD); //right tires
  M3->run(BACKWARD);
}

//left turn function, no forward or backwards motion
void goLeft(int tSpeed) {
  tSpeed = tSpeed - (tSpeed*.2); //reduce speed by 20%
  M1->setSpeed(tSpeed);
  M2->setSpeed(tSpeed);
  M3->setSpeed(tSpeed);
  M4->setSpeed(tSpeed);
   //code to turn Right
  M2->run(BACKWARD); //left tires
  M4->run(BACKWARD);
  M1->run(FORWARD); //right tires
  M3->run(FORWARD);
}

//This function scales the speed values from the joystick ADCs to the speed values of the motors
int scaleSpeed(int scale) {
  float r = ((float)scale/500)*250;
  return int(r);
}

//This scales the turns based on the forward / backward speeds
int scaleTurn(int fBSp, int lRSp) {
  float r =(float)fBSp*(1 - (float)lRSp/500);
  return int(r);
}


Wednesday, April 30, 2014

Building a Bluetooth Remote Control Car

In this post we build a remote control car and controller / joystick using Bluetooth for communication and Arduino for control. A fun project for all ages! At the end of the post you will find the code and schematics shown in the video.


Bluetooth RC Car Schematics
/* This sketch is for a remote controlled car with four electric motors that uses the Arduino Uno, RN42 Bluetooth module, and an
Adafruit Motorshield. This code is free for anybody to use or modify
*/

#include <Wire.h> //needed for motors and motor shield
#include <Adafruit_MotorShield.h> //needed for motors and motor shield
#include "utility/Adafruit_PWMServoDriver.h" //needed for motors and motor shield
#include <ctype.h>

int con = 0; //global variable to track connection status
// Create the motor shield object with the default I2C address
Adafruit_MotorShield AFMS = Adafruit_MotorShield(); 
// create an object for each motor and assign it to a port on the shield 
Adafruit_DCMotor *M1 = AFMS.getMotor(1);
Adafruit_DCMotor *M2 = AFMS.getMotor(2);
Adafruit_DCMotor *M3 = AFMS.getMotor(3);
Adafruit_DCMotor *M4 = AFMS.getMotor(4);
int count = 0; //counts how long its been since comms from joystick
 String uDSpeed = "500"; //create global variables to hold speed and direction info
 String lRSpeed = "500"; //defulat is 500 because that is stop condition

//setup code only executed once
void setup() {
  Serial.begin(115200); //start serial comm
  delay(1000); //delay for serial comm to start up
  do //do while loop for putting RN42 module into command mode
  {
   clearSerialBuf(); //empty serial read buffer
   Serial.print("$$$"); //but BT module in command mode
   delay(1000); //Wait for module to enter command mode
  } while ((char)Serial.read() != 'C'); //look for C from CMD response to confirm in command mode
  
  clearSerialBuf(); //empty serial read buffer

 while(!con) { //Connect to bluetooth device and keep trying until successful
  connectBT("0006666741AD"); //call function to connect, address is hardcoded, if connection is succesful "con" is set
  clearSerialBuf(); //empty serial buffer
  delay(4000); //delay after connect
 }

 Serial.print('#'); //Send this to tell joystick that we are connected, this will cause the joystick to exit setup code

 AFMS.begin();  //Start motor shield object, create with the default frequency 1.6KHz


void loop() {
  
  //check if a full speed / direction frame is ready to be read
  if(Serial.available() >= 6) {
    String temp; //temperary string to hold incoming data
    char c = (char)Serial.read();
    if(c == 'u') { //If a 'u' was read this is start of an up / down data frame
      for(int i=0; i<5; i++) { //loop to read 5 other bytes of frame
        if(i < 4) { //reads the speed portion of frame into string 
          temp += (char)Serial.read();
        }
        else { //look for end of frame 'd' character, if it is there save this reading as new speed
          if((char)Serial.read() == 'd') { 
           uDSpeed = temp; 
           count = 0; //just got speed so reset count
          }
        }
      }
    }
    else if(c == 'l') { //If a 'l' was read this is start of an left / right data frame
      for(int i=0; i<5; i++) { //following code is the same as above except for direction frame
        if(i < 4) {
          temp += (char)Serial.read();
        }
        else {
          if((char)Serial.read() == 'r') { 
           lRSpeed = temp; 
           count = 0; //just got speed so reset count
          }
        }
      }
    }
  }
  
  delay(1);
  //the following code will stop the car if no comms with joystick for 150ms
  count++;
  if(count > 20) {
    setMotorSpeed(500,500);
  }
  
  //function call to set motor speeds
  setMotorSpeed(uDSpeed.toInt(),lRSpeed.toInt());
}

//This function connects with a BT module. Input is the device's address
//If the connection is successful
void connectBT(String address) {
  //module is in command mode send action command to connect with to address
  Serial.print("C," + address + "\r");
  //successful response to connection command
  //TRYING
  //%CONNECT,0006666741AD,0
  int done = 0; //variable to track when connection response is recieved
  
  while(!done) { //wait for reply, read it and set connection variable accordingly
    if(Serial.available()) { //if data is ready to be read
      char c = (char)Serial.read();
      if(c=='%') { //this is variable set in RN42 firmware for connection response
        if((char)Serial.read() == 'C') { //if followed by 'C' connection was successful
          con = 1; //set connection variable
          done = 1; //we can exit loop
        }
        else { //if not a C then connection failed
         con = 0; //not connected
         done = 1; //exit loop
        }
      }
      else if(c == 'f') { //if this is an 'f' connection failed
        con = 0;
        done = 1;
      }
      else { } //do nothing
    }
    delay(50); //delay before running loop again
  }
}

//This function clears all bytes out of arduino serial read buffer
void clearSerialBuf() {
 while(Serial.available()) { Serial.read(); }
}

//This function uses the ADC values from the joystick and turns them into motor speeds for going 
//forware, right, left, and reverse. Inputs are the left/right and up/down joystick axis
void setMotorSpeed(int upDown, int leftRight) {
  int lR = 0;
  int bF = 0;
  
  //If left/right is 500 no turn 
  if(leftRight == 500) {
    lR = 0;
  }
   else if(leftRight > 500) { //If greater than 500 this is a right turn
     lR = 1;
     leftRight = leftRight - 500;
   }
   else { //less than 500 this is a left turn
     lR = 2;
     leftRight = 500 - leftRight;
   }
   
   if(upDown == 500) { //500 no up/down direction
      bF = 0;
   }
   else if(upDown > 500) {//more than 500 go forward
     bF = 1;
     upDown = upDown - 500;
   }
   else { //less than 500 go backward
     bF = 2;
     upDown = 500 - upDown;
   }
   
   //If direction variables are both 0 the car is stopped
   if(lR == 0 && bF == 0) {
     motorStop();
   }
   else if (bF==1) { //if forward variable is true
     if(lR == 0) { //no turn so go straight forward
       goForward(scaleSpeed(upDown));
     }
     else if(lR == 1) { //go forward and right
       goTurn(scaleSpeed(scaleTurn(upDown,leftRight)), scaleSpeed(upDown), 1);
     }
     else { //go forward and left
       goTurn(scaleSpeed(upDown),scaleSpeed(scaleTurn(upDown,leftRight)), 1);
     }
   }
   else if (bF==2) { //if backwards variable is true
     if(lR == 0) { //go straight backwards
       goBackward(scaleSpeed(upDown));
     }
     else if(lR == 1) { //go backward and right
       goTurn(scaleSpeed(scaleTurn(upDown,leftRight)), scaleSpeed(upDown), 0);
     }
     else { //go backward and left
       goTurn(scaleSpeed(upDown),scaleSpeed(scaleTurn(upDown,leftRight)), 0);
     }
   }
   else { //if no forward or back then just turn
     if(lR==1) { //Right turn, left wheels forward and right wheels backwards
       goRight(scaleSpeed(leftRight));
     }
     else { //left turn, right wheels forward and left wheels backwards
       goLeft(scaleSpeed(leftRight));
     }
   }
}

//function to stop the motors
void motorStop() {
  M2->run(RELEASE);
  M4->run(RELEASE);
  M1->run(RELEASE);
  M3->run(RELEASE);
}

//function to tell motors to go forward, input is speed
void goForward(int mSpeed) {
  M1->setSpeed(mSpeed);
  M2->setSpeed(mSpeed);
  M3->setSpeed(mSpeed);
  M4->setSpeed(mSpeed);
  M2->run(FORWARD);
  M4->run(FORWARD);
  M1->run(FORWARD);
  M3->run(FORWARD);
}

//function to tell motors to go backward, input is speed
void goBackward(int mSpeed) {
  M1->setSpeed(mSpeed);
  M2->setSpeed(mSpeed);
  M3->setSpeed(mSpeed);
  M4->setSpeed(mSpeed);
  M2->run(BACKWARD);
  M4->run(BACKWARD);
  M1->run(BACKWARD);
  M3->run(BACKWARD);
}


//function for left or right turn. inputs are speed for left tires and speed for right tires
//and whether we are going forward or backwards
void goTurn(int rTire, int lTire, int forward) {
  
  M1->setSpeed(rTire);
  M2->setSpeed(lTire);
  M3->setSpeed(rTire);
  M4->setSpeed(lTire);
   //code to turn Right
  if(forward) {
    M2->run(FORWARD); //M2 and M4 are left tires
    M4->run(FORWARD);
    M1->run(FORWARD); //M1 and M3 are right tires
    M3->run(FORWARD);
  }
  else {
    M2->run(BACKWARD);
    M4->run(BACKWARD);
    M1->run(BACKWARD);
    M3->run(BACKWARD);
  }
}

//right turn function, no forward or backwards motion
void goRight(int tSpeed) {
  M1->setSpeed(tSpeed);
  M2->setSpeed(tSpeed);
  M3->setSpeed(tSpeed);
  M4->setSpeed(tSpeed);
   //code to turn Right
  M2->run(FORWARD); //left tires
  M4->run(FORWARD);
  M1->run(BACKWARD); //right tires
  M3->run(BACKWARD);
}

//left turn function, no forward or backwards motion
void goLeft(int tSpeed) {
  M1->setSpeed(tSpeed);
  M2->setSpeed(tSpeed);
  M3->setSpeed(tSpeed);
  M4->setSpeed(tSpeed);
   //code to turn Right
  M2->run(BACKWARD); //left tires
  M4->run(BACKWARD);
  M1->run(FORWARD); //right tires
  M3->run(FORWARD);
}

//This function scales the speed values from the joystick ADCs to the speed values of the motors
int scaleSpeed(int scale) {
  float r = ((float)scale/500)*250;
  return int(r);
}

//This scales the turns based on the forward / backward speeds
int scaleTurn(int fBSp, int lRSp) {
  float r =(float)fBSp*(1 - (float)lRSp/500);
  return int(r);
}

Bluetooth Joystick

/*This arduino sketch is for a joystick for controller an RC car. The joystick is Parallax 2 axis
joystick. The RN42 Bluetooth module is used to communicate with the RC car. This code is free for 
anybody to use or modify*/

int UD = 500; //Variable for storing up / down joystick axis for forward / reverse speed
int LR = 500; //Variable for storing left / right joystick axis reading for direction
int con = 0; //Variable to track if RN42 is connected

void setup() {
  Serial.begin(115200); //start serial commm
  
  //This loop runs until a connection from another RN42 is complete and a "#" is recieved from the car
  //The joystick RN42 is the slave
  while(!con) { 
    if((char)Serial.read() == '#') { con = 1; }//once connected change "con" to true
    delay(5);
  }
}

void loop() {
   UD = filter(analogRead(A0)); //Read up / down joystick axis value, apply filter, and store result
   LR = filter(analogRead(A1)); //Read left / right joystick axis value, apply filter, and store result
   Serial.print(formatValue(UD,1)); //format up / down axis value into packet and send it to RC car
   delay(7);
   Serial.print(formatValue(LR,0)); //format left / right axis value into packet and send it to RC car
   delay(7);
}

//This function sets joystick resting axis values to a consistent value (500) for both axis. It also
//keeps extreme values in a consistent range
int filter(int jRead) {
  if(jRead > 485 && jRead < 540) { return 500; }
  else if(jRead < 20) { return 0; }
  else if(jRead > 1000) {return 1000; }
  else { return jRead; }
}

//This function creates the up / down and left / right packets for RC car to read.
//It makes every value four digits and adds a starting and ending character for each packet
//The input is the speed or direction value and packet type (speed or direction)
String formatValue(int val, int udlr) {
 String temp;

  if(val < 10) { //if below 10 add three leading zeros
   temp = "000" + (String)val;
  } 
  else if (val < 100) { //if below 100 add two leading zeros
   temp = "00" + (String)val; 
  }
  else if (val < 1000) { //if below 1000 add one leading zero
   temp = "0" + (String)val; 
  }
  else { temp = (String)val; } //if 1000 add no zeros
  
  if(udlr) { //for speed packet add 'u' to front and 'd' to back
    temp = 'u' + temp + 'd';
  }
  else { //for direction packet add 'l' to front and 'r' to back
    temp = 'l' + temp + 'r';
  }
  
  return temp;
}

Monday, March 24, 2014

Getting Started with the RN42 Bluetooth Module

In this video post tutorial we go over the basics of using the RN42 Bluetooth module. This tiny but capable Bluetooth module makes it easy to add wireless capability to any project or design. Topics covered include:
  • Connecting to and communicating with the RN42 wirelessly 
  • Using the RN42 in command mode to change settings
  • Wireless communication with an Arduino Uno using the RN42


RN42 Tutorial Schematics
Basic Setup with Serial Pins Shorted Together
RN42 Connected to Arduino Uno
Communicating with an Arduino wirelessly using the RN42 Bluetooth module
/*This Arduino Uno sketch was used to communicate with an Arduino Uno wirelessly using a serial terminal and the RN42 Bluetooth module. This code is free and open for anyone to use*/

void setup() {
  //set baud rate to match BT module
  Serial.begin(115200);
}

void loop() {

  String t; //string to hold data from BT module
  while(Serial.available()) { //keep reading bytes while they are still more in the buffer
    t += (char)Serial.read(); //read byte, convert to char, and append it to string
  }

  if(t.length()) { //if string is not empty do the following

    if(t == "Hi Uno\r\n") { Serial.print("Hello Neil\n"); } //say hello
    else if(t == "Meaning of life?\r\n") { //find out the meaning of life
      delay(1000);
      Serial.print("Money. ");
      delay(1000);
      Serial.print("Guns. ");
      delay(1000);
      Serial.print("Hoes.\n");
   }
    else { Serial.print("Syntax Error\n"); } //send this for any other string
   }
   delay(20);
}

Sunday, March 23, 2014

Voltage Level Shifting Tutorial

In this tutorial we look at three methods for shifting or converting a digital logic level from one voltage level to another voltage level. For instance how to convert a 3.3 V serial signal to a 5 V serial signal or vice versa. Voltage level shifting or voltage translation is needed for serial communication between an Arduino Uno (5 V) and an XBee Zigbee module or an RN42 Bluetooth module (3.3 V).


Level Shifting Tutorial Schematics
Level Shifting with a Voltage Divider
Level Shifting with a NPN Transistor
Level Shifting TX Arduino Sketch
/*The code was used for the Arduino Uno and Duo, whichever was acting as the serial communication transmitter in the tutorial at the time. This code is free and open to all to use. */

void setup() {
//Want to use fast baud rate for this example
Serial.begin(115200);
}

void loop() {
// Just transmit same message over and over
Serial.write("forcetronics\n");
delay(10);
}

Level Shifting RX Arduino Sketch
/*The code was used for the Arduino Uno and Duo, whichever was acting as the serial communication reciever in the tutorial at the time. This code is free and open to all to use. */

void setup() {
//Want to use a fast baud rat
Serial.begin(115200);
}

void loop() {
//look for a serial data and print it
while(Serial.available()) {
  char c = (char)Serial.read();
  Serial.print(c);
}

delay(2);
}

Sunday, March 9, 2014

Building a Motion Coded Light

In this project we build a motion coded light. What is a motion coded light? A light that is turned on or off using a certain sequence of hand or body movements (like a secret handshake). To build a motion coded light you need an Arduino Uno, a high power relay, and an infrared switch. Check out the video below to learn more....


Motion Coded Light Schematic

Motion Coded Light Arduino Sketch
//The following Arduino code for the motion coded light is totally open for anybody to use for anything
int tog = LOW; //variable for toggling the light on or off
const int val = 350; //value for tracking if IR switch has been tripped

void setup() {//only setup code is to set digital pin to output
  pinMode(9, OUTPUT); //Using digital pin 9 to control relay
}

void loop() {
  
  if (analogRead(A5) < val) { //look for object in front of sensor (switch is tripped)

    for (int i=0; i<14; i++) { //check for object to move out of sensor range within 420 ms
       delay(30);

       if (analogRead(A5) >= val) { //look for object to move from sensor

         for (int j=0; j<14; j++) { //give the object 420 ms to move back in front of sensor
           delay(30);
          
           if (analogRead(A5) < val) { //look for object in front of sensor
             int activate = HIGH; //variable to track if the light should be turned off or on
             
             for (int c=0; c<100; c++) { //ensure the object stays in front of sensor for 1 second
               delay(10); //delay 10 ms 10o time for 1 sec total
              
               if (analogRead(A5) > val) { //if object is not in front of sensor for 1 sec break out of loop and do not toogle switch
                 activate = LOW; //set variable to not toogle switch
                 break; //break out of loop
               }
             }
             
             if(activate == HIGH) { //if variable is high toogle light switch
               tog = toggleSwitch(tog); //toggle switch value so opposite action is taken next time
               digitalWrite(9,tog); //write value to digital pin to open or close relay
               delay(1500); //delay 1.5 seconds so switch is not unintentionally toogled again
             }
             break;
           }
         }
         break;
       }
    }
  }
  
  delay(100);
}

//function toggles variable that controls switch position
int toggleSwitch(int t) {
  
  if(t==LOW) { return HIGH; }
  else { return LOW; }
}

Thursday, February 6, 2014

Building a Wireless Temperature Sensor Network Part 1

In this ForceTronics' inaugural project we will be building a wireless temperature sensor network that will include features such as battery powered sensors and the ability to access the temperature data over the internet via a computer or an iOS device such as an iPhone.

The two main building blocks we will be using for this project are an Arduino Board (first the Uno and then later the Yun to add internet capability) and XBee Wireless RF Modules. Now it is assumed that the reader has a basic understanding what Arduino is and some basic experience with the Arduino Uno board, if you do not have Arduino experience don't fret just go to arduino.cc to get started and come back here when you are ready. As for XBee, no experience is necessary we will go over the basics of using XBee here for this project.

Building a wireless temperature sensor network is no easy task so we will break this project up into parts and each part will be covered in a separate post. The project will be broken up into 6 parts, they are as follows:
  1. Introduction, getting started with XBee, and using XBee with Arduino (This post is part 1)
  2. Gathering data from multiple sensors
  3. Design options for powering your sensor network
  4. Design options for powering your sensor network continued 
  5. Monitoring your sensor network over the internet and logging temperature data
  6. Connecting to your sensor network with your iOS device
The focus of the rest of this post will be to learn the basics of XBee and how to use it with Arduino. In an attempt not to reinvent the wheel, we will refer to some fantastic XBee video tutorials created by "tunnelsup." The "XBee Basics" video tutorials is a series made up of 5 video, but you do not need to do all of the videos to complete this project. I am recommended that you actually get the parts and complete Lessons 1 and 4. For lessons 2 and 3 I recommend you watch them and follow along, but you do not need to actually get all the parts and do them (unless you want to). You will not need to do lesson 5 for this project, but if you want to feel free it can only help. Each video provides a parts list of what is needed to complete the tutorial, but if you want to buy in bulk to get you through part 1 and 2 of this project see the parts list at the end of this post.

XBee Basics - Lesson 1 - General Information and Initial Setup

XBee Basics - Lesson 2 - Simple Chat Program Between Two XBees


Hardware you will need for part 1 and 2 of the wireless temperature sensor network project is listed below. Two places where you can buy all this hardware is sparkfun.com and adafruit.com.
  • An Arduino Uno or similar Arduino board. When we add internet connectivity in part 4 to our sensor network we will switch to the Arduino Yun. 
  • Three XBee Modules, ZB Series 2, 2mW with Wire Antenna.
  • Either three XBee Explorers USB from SparkFun or three XBee Adapter Kits from Adafruit (used in video tutorial) for programming and connecting to our XBee modules. If you want to save some money you could just buy two XBee Explorer boards or Xvee Adapter boards, but you will need to buy parts to get your XBee board to plug into a standard breadboard.
  • At least two cables to connect your XBee Explorer boards or XBee Adapter boards to a computer. See the product details for which type cable you need with your board.
  • Three mini breadboards.
  • Three TMP36 or MCP9700 temperature sensors.
  • A power supply that is capable of outputting 3.3 V for powering two of the XBee modules. If you are using the Adafruit Xbee Adapter Kits your power supply can output anywhere between 3.3 V and 5 V since they have an onboard regulator. The third XBee module will be powered by the Arduino board. 
  • Wiring, wire strippers, and a soldering iron
That is it for part 1 of building a wireless temperature sensor network. If you have any questions on what was covered here feel free to asked them in the comments section below or email me at forcetronics@gmail.com. Stay tuned for part 2!