Tuesday, July 21, 2015

Using a Transistor as a Switch

In this video we cover briefly what a transistor is and discuss how to use them as an electrical switch (DC only). As a demonstration we use an Arduino to switch on and off an NPN transistor and a PNP transistor.


//************************Arduino Code ******************************
//This example code was used on the Forcetronics YouTube Channel to demonstrate how to
//make an inverter or not gate using an NPN and PNP transistor. This code is open for
//anybody to use or modify

const int BJT = 2; //create variable to control the base of NPN and PNP

void setup() {
  pinMode(BJT, OUTPUT);   // set it as digital output
}

void loop() {
  digitalWrite(BJT, LOW);   // set base of NPN and PNP to low
  delay(1000);
  digitalWrite(BJT, HIGH);   // set base of NPN and PNP to high
  delay(1000);
}
Friday, July 10, 2015

Building Your Own AVR / Arduino Internet of Things (IoT) Development Board Part 4

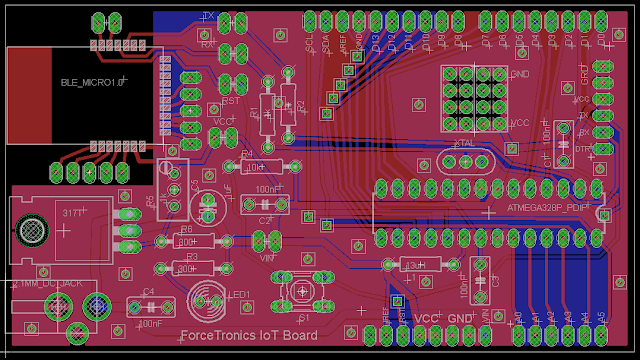
This is part 4 in a 5 part series where we build our own AVR / Arduino Internet of Things (IoT) development board, yay! In this part we will do the PCB layout and discuss how to get our PCB manufactured.


Download Eagle Files


Eagle Parts and Libraries
Libraries Used:
•Atmega 328P --> Library: SparkFun-DigitalIC Device: ATMEGA328P_PDIP
•LM317 --> Library: linear>*317 Device:317T
•Resonator ZTT16.0MHz --> Library: Adafruit Device: CERMOSCILL-THM (CERMOSCILL)
•Ceramic Cap --> Library: rcl > C-EU Device: C-EU050-030X075
•Electrolytic cap --> Library: rcl > CPOL-EU Device: CPOL-EUE2.5-6
•Resistor --> Library: resistor Device: R-EU_0207/10 (R-EU_) Package: 0207/10
•Reset switch --> Library: switch-omron Device: 10-XX
•LED --> Library: led Device: LED5MM (LED)
•Potentiometer --> Library: rcl > R-TRIMM Device: R-TRIMMT93YA
Note: Sparkfun and Adafruit libraries did not come with Eagle, but you can find them on their websites

Parts I made (included in files linked to my blog):
•ForceTronic.lbr --> All header and pin holes and 2.1mm DC Jack
•BLE_Micro_Module.lbr --> BLE Micro

Monday, July 6, 2015

Building Your Own AVR / Arduino Internet of Things (IoT) Development Board Part 3

This is part 3 in a 5 part series where we build our own AVR / Arduino Internet of Things (IoT) development board, yay! In this part we will finalize our design schematic and parts list so we are ready to do PCB layout in part 4.


Final Design Schematic:


Bill of Materials:
  • Atmega 328P MCU (Dip Package)
  • 16MHz resonator
  • BLE Micro from DFRobot or equivalent
  • LM317 Voltage Regulator
  • Resistors (Ohms): 10k, 2x 1k, 2x 300, 1k POTENTIOMETER or 500
  • Capacitors: 4x 100nF (Ceramic) and 1uF (electrolytic)
  • LED 5mm (any color you want)
  • 0.1” male pins
  • 2x 0.1” 2x4 female header (optional)
  • 4x 0.1” pin jumpers
  • DC Power Jack (+ pin is 2.1mm) 
  • 13uH Inductor (optional)
  • Female pin headers: 6 pin, 2x 8 pin, 10 pin
  • 28 pin DIP Socket (optional): part # 4828-3004-CP