Link to Eagle files on GitHub: https://github.com/ForceTronics/Neo-7m_Eagle_Design/tree/master
Friday, August 25, 2017
Easy Way to Design a PCB for the Ublox Neo-7m GNSS / GPS Module
In this tutorial we look at how easy it is to integrate the popular Neo-7m GNSS / GPS module into your design without having to be an RF / microwave expert.
Link to Eagle files on GitHub: https://github.com/ForceTronics/Neo-7m_Eagle_Design/tree/master
Link to Eagle files on GitHub: https://github.com/ForceTronics/Neo-7m_Eagle_Design/tree/master

Thursday, August 10, 2017
Getting Started with Arduino and the ThingSpeak Cloud
In this video we look at how to use Arduino with the ThingSpeak IoT, cloud, and analytics platform. In the video we look at two use cases of ThingSpeak. For the first use case we log wireless sensor data to the cloud and perform post processing on the data using MATLAB. In the second use case we monitor a room with a wireless motion detector setup and have ThingSpeak send out a Tweet if any movement is detected in the room.
//*****************Arduino code from video**********************************
/*
This sketch was created for a video tutorial on the ForceTronics YouTube that shows how to use Arduino with the ThingSpeak cloud
This code is public domain and free for anybody to use or modify at their own risk
Note this code was leveraged from:
Arduino --> ThingSpeak Channel via MKR1000 Wi-Fi
Created: May 7, 2016 by Hans Scharler (http://www.nothans.com)
*/
#include <SPI.h>
#include <WiFi101.h> //This sketch should work with any Arduino or shield that can use the WiFi101 library
char ssid[] = "YourNetwork"; // your network SSID (name)
char pass[] = "YourPassword"; // your network password
int status = WL_IDLE_STATUS;
// Initialize the Wifi clients
WiFiClient tClient; //this one is used to post temperature data
WiFiClient mClient; //this one is used to post motion detection data
// ThingSpeak Settings
char server[] = "api.thingspeak.com";
String writeAPIKey = "YourWriteKey";
//Timing variables for tracking temperature posting
unsigned long tempLastConnectionTime = 0; // track the last connection time
const unsigned long tempPostingInterval = 295000L; // post temp ADC value just under every 5 min
//Timing and logic variables for tracking temperature posting
unsigned long mLastConnectionTime = 0; // track the last connection time
const unsigned long mPostingInterval = 30000L; //checks to see if motion was detected every 30 sec
bool mReset = true; //tracks if motion detection has been reset
void setup() {
pinMode(2,INPUT); //digital pin used to read output of motion detector
pinMode(6,OUTPUT); //LED pin used to know when data is sent to cloud
// attempt to connect to Wifi network
while ( status != WL_CONNECTED) {
// Connect to WPA/WPA2 Wi-Fi network
status = WiFi.begin(ssid, pass);
// wait 10 seconds for connection
delay(10000);
}
}
void loop() {
//timer to know when it is time to post temp data to cloud
if (millis() - tempLastConnectionTime > tempPostingInterval) {
digitalWrite(6,HIGH); //Use the LED to see if Arduino gets heldup posting data to the cloud
tempHttpRequest(); //function that formats data strings and posts data to ThingSpeak cloud
digitalWrite(6,LOW);
}
if (millis() - mLastConnectionTime > mPostingInterval) {
digitalWrite(6,HIGH); //Use the LED to see if Arduino gets heldup posting data to the cloud
if(digitalRead(2) && mReset) { //if motion was detected post it
mReset = false; //motion detected so reset variable
mHttpRequest(); //if true motion was detected so post to cloud
}
else mReset = true; //reset logic tracker
digitalWrite(6,LOW);
}
}
//Posts temp data to thingspeak cloud
void tempHttpRequest() {
// read analog pin 0 with temp sensor connected
int sensorValue = analogRead(0);
// create data string to send to ThingSpeak
String data = String("field1=" + String(sensorValue, DEC));
// POST data to ThingSpeak
if (tClient.connect(server, 80)) {
tClient.println("POST /update HTTP/1.1");
tClient.println("Host: api.thingspeak.com");
tClient.println("Connection: close");
tClient.println("User-Agent: ArduinoWiFi/1.1");
tClient.println("X-THINGSPEAKAPIKEY: "+writeAPIKey);
tClient.println("Content-Type: application/x-www-form-urlencoded");
tClient.print("Content-Length: ");
tClient.print(data.length());
tClient.print("\n\n");
tClient.print(data);
// close any connection before sending a new request
tClient.stop();
// note the last connection time
tempLastConnectionTime = millis();
}
}
//posts motion detection data to thingspeak cloud
void mHttpRequest() {
// create data string to send to ThingSpeak, we always send a one here to indicate motion detected
String data = String("field2=" + String(1,DEC));
// POST data to ThingSpeak
if (mClient.connect(server, 80)) {
mClient.println("POST /update HTTP/1.1");
mClient.println("Host: api.thingspeak.com");
mClient.println("Connection: close");
mClient.println("User-Agent: ArduinoWiFi/1.1");
mClient.println("X-THINGSPEAKAPIKEY: "+writeAPIKey);
mClient.println("Content-Type: application/x-www-form-urlencoded");
mClient.print("Content-Length: ");
mClient.print(data.length());
mClient.print("\n\n");
mClient.print(data);
// close any connection before sending a new request
mClient.stop();
// note the last connection time
mLastConnectionTime = millis();
}
}
//*****************Arduino code from video**********************************
/*
This sketch was created for a video tutorial on the ForceTronics YouTube that shows how to use Arduino with the ThingSpeak cloud
This code is public domain and free for anybody to use or modify at their own risk
Note this code was leveraged from:
Arduino --> ThingSpeak Channel via MKR1000 Wi-Fi
Created: May 7, 2016 by Hans Scharler (http://www.nothans.com)
*/
#include <SPI.h>
#include <WiFi101.h> //This sketch should work with any Arduino or shield that can use the WiFi101 library
char ssid[] = "YourNetwork"; // your network SSID (name)
char pass[] = "YourPassword"; // your network password
int status = WL_IDLE_STATUS;
// Initialize the Wifi clients
WiFiClient tClient; //this one is used to post temperature data
WiFiClient mClient; //this one is used to post motion detection data
// ThingSpeak Settings
char server[] = "api.thingspeak.com";
String writeAPIKey = "YourWriteKey";
//Timing variables for tracking temperature posting
unsigned long tempLastConnectionTime = 0; // track the last connection time
const unsigned long tempPostingInterval = 295000L; // post temp ADC value just under every 5 min
//Timing and logic variables for tracking temperature posting
unsigned long mLastConnectionTime = 0; // track the last connection time
const unsigned long mPostingInterval = 30000L; //checks to see if motion was detected every 30 sec
bool mReset = true; //tracks if motion detection has been reset
void setup() {
pinMode(2,INPUT); //digital pin used to read output of motion detector
pinMode(6,OUTPUT); //LED pin used to know when data is sent to cloud
// attempt to connect to Wifi network
while ( status != WL_CONNECTED) {
// Connect to WPA/WPA2 Wi-Fi network
status = WiFi.begin(ssid, pass);
// wait 10 seconds for connection
delay(10000);
}
}
void loop() {
//timer to know when it is time to post temp data to cloud
if (millis() - tempLastConnectionTime > tempPostingInterval) {
digitalWrite(6,HIGH); //Use the LED to see if Arduino gets heldup posting data to the cloud
tempHttpRequest(); //function that formats data strings and posts data to ThingSpeak cloud
digitalWrite(6,LOW);
}
if (millis() - mLastConnectionTime > mPostingInterval) {
digitalWrite(6,HIGH); //Use the LED to see if Arduino gets heldup posting data to the cloud
if(digitalRead(2) && mReset) { //if motion was detected post it
mReset = false; //motion detected so reset variable
mHttpRequest(); //if true motion was detected so post to cloud
}
else mReset = true; //reset logic tracker
digitalWrite(6,LOW);
}
}
//Posts temp data to thingspeak cloud
void tempHttpRequest() {
// read analog pin 0 with temp sensor connected
int sensorValue = analogRead(0);
// create data string to send to ThingSpeak
String data = String("field1=" + String(sensorValue, DEC));
// POST data to ThingSpeak
if (tClient.connect(server, 80)) {
tClient.println("POST /update HTTP/1.1");
tClient.println("Host: api.thingspeak.com");
tClient.println("Connection: close");
tClient.println("User-Agent: ArduinoWiFi/1.1");
tClient.println("X-THINGSPEAKAPIKEY: "+writeAPIKey);
tClient.println("Content-Type: application/x-www-form-urlencoded");
tClient.print("Content-Length: ");
tClient.print(data.length());
tClient.print("\n\n");
tClient.print(data);
// close any connection before sending a new request
tClient.stop();
// note the last connection time
tempLastConnectionTime = millis();
}
}
//posts motion detection data to thingspeak cloud
void mHttpRequest() {
// create data string to send to ThingSpeak, we always send a one here to indicate motion detected
String data = String("field2=" + String(1,DEC));
// POST data to ThingSpeak
if (mClient.connect(server, 80)) {
mClient.println("POST /update HTTP/1.1");
mClient.println("Host: api.thingspeak.com");
mClient.println("Connection: close");
mClient.println("User-Agent: ArduinoWiFi/1.1");
mClient.println("X-THINGSPEAKAPIKEY: "+writeAPIKey);
mClient.println("Content-Type: application/x-www-form-urlencoded");
mClient.print("Content-Length: ");
mClient.print(data.length());
mClient.print("\n\n");
mClient.print(data);
// close any connection before sending a new request
mClient.stop();
// note the last connection time
mLastConnectionTime = millis();
}
}
%*************************MATLAB code from video***************************
% Channel ID to read raw ADC temp data from
readChannelID = chanID;
% Temperature Field ID
TemperatureFieldID = 1;
% Channel Read API Key
readAPIKey = 'YourReadKey';
% Channel ID to write temp data to:
writeChannelID = [chanID];
% API key for write channel:
writeAPIKey = 'YourWriteKey';
%Read raw ADC temp data
aDC = thingSpeakRead(readChannelID, 'Fields', TemperatureFieldID, 'ReadKey', readAPIKey);
%Convert raw 10 bit ADC data to voltage
volt = aDC*(3.3/1023);
%Using analog temp sensor TMP36
%calculate temp in C, .75 volts is 25 C. 10mV per degree
if volt < .75
temp = 25 - ((.75-volt)/.01); %if below 25 C
elseif volt == .75
temp = 25;
else
temp = 25 + ((volt -.75)/.01); %if above 25
end
% Convert to Fahrenheit
tempF = (9/5*temp) + 32;
%This writes temp value to below console for debugging
display(tempF);
%write temp F value to channel
thingSpeakWrite(writeChannelID, 'Fields',1,'Values',tempF, 'Writekey', writeAPIKey);
Saturday, June 10, 2017
Using Compiler Directives with Arduino
In this video we look at what are compiler directives and how they can come in handy.
//***********************Arduino code from the video***********
/*
* This code was made for a video tutorial on ForceTronics YouTube Channel called "Using Compiler Directives with Arduino"
* This code free to be used or modified by anybody at your own risk
*
*/
//#define SERIAL_PRINT 1
#define ADC_PIN (uint8_t)A0
#ifdef SERIAL_PRINT
#define _SERIAL_BEGIN(x) Serial.begin(x);
#define _SERIAL_PRINT(x) Serial.print(x);
#define _SERIAL_PRINTLN(x) Serial.println(x);
#else
#define _SERIAL_BEGIN(x)
#define _SERIAL_PRINT(x)
#define _SERIAL_PRINTLN(x)
#endif
void setup() {
_SERIAL_BEGIN(57600); //start serial comm if enabled
//This will only print if SERIAL_PRINT is 1
_SERIAL_PRINTLN("We are going to take an ADC reading every 2 sec...");
}
void loop() {
_SERIAL_PRINT("The latest ADC measurement is ");
_SERIAL_PRINTLN(analogRead(ADC_PIN));
delay(2000);
}
//***********************Arduino code from the video***********
/*
* This code was made for a video tutorial on ForceTronics YouTube Channel called "Using Compiler Directives with Arduino"
* This code free to be used or modified by anybody at your own risk
*
*/
//#define SERIAL_PRINT 1
#define ADC_PIN (uint8_t)A0
#ifdef SERIAL_PRINT
#define _SERIAL_BEGIN(x) Serial.begin(x);
#define _SERIAL_PRINT(x) Serial.print(x);
#define _SERIAL_PRINTLN(x) Serial.println(x);
#else
#define _SERIAL_BEGIN(x)
#define _SERIAL_PRINT(x)
#define _SERIAL_PRINTLN(x)
#endif
void setup() {
_SERIAL_BEGIN(57600); //start serial comm if enabled
//This will only print if SERIAL_PRINT is 1
_SERIAL_PRINTLN("We are going to take an ADC reading every 2 sec...");
}
void loop() {
_SERIAL_PRINT("The latest ADC measurement is ");
_SERIAL_PRINTLN(analogRead(ADC_PIN));
delay(2000);
}
Tuesday, May 30, 2017
Home Automation with Arduino and the Amazon Echo Part 4
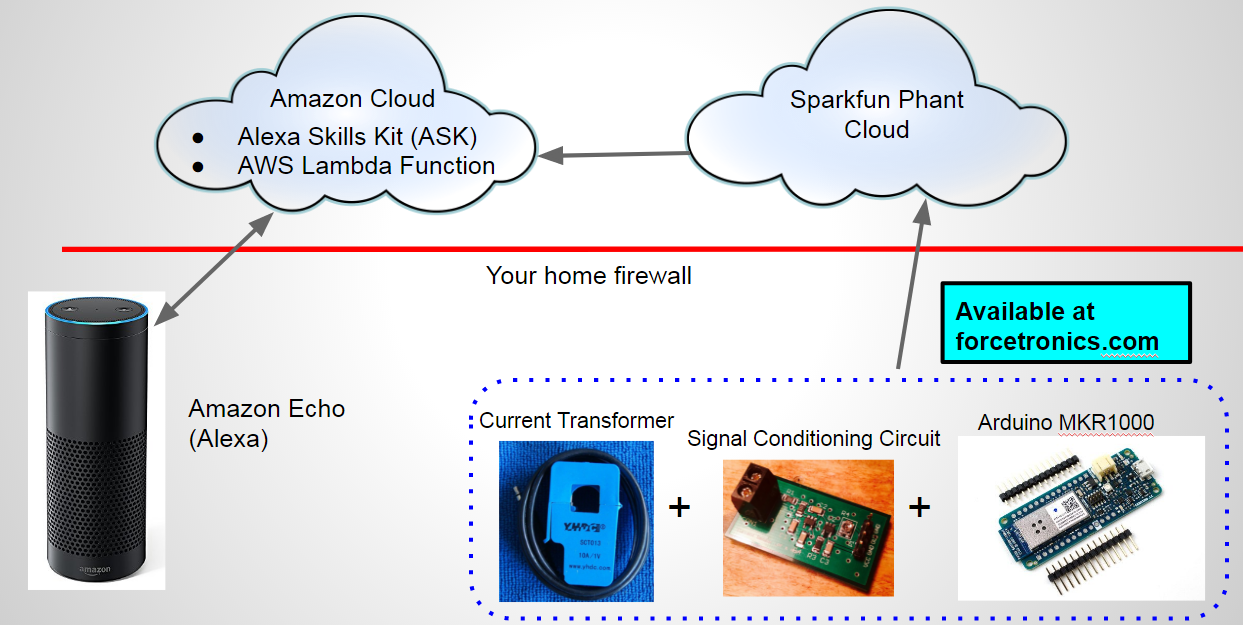
In the final conclusion of this four part series on using the Amazon Echo and Arduino for home automation we look at the Arduino hardware setup for monitoring the current consumption of a washer machine and reports its state to the cloud.
You can access code from GitHub: https://github.com/ForceTronics/Arduino_Echo_Home_Automation

You can access code from GitHub: https://github.com/ForceTronics/Arduino_Echo_Home_Automation

Friday, May 26, 2017
Home Automation with the Arduino and the Amazon Echo Part 3
In part 3 instead of controlling a household device with the Echo, Arduino, and the cloud like we did in parts 1 and 2, we are monitoring an appliance (washer) so the data is flowing in the opposite direction.
You can access the code on github: https://github.com/ForceTronics/Arduino_Echo_Home_Automation

You can access the code on github: https://github.com/ForceTronics/Arduino_Echo_Home_Automation
Sunday, April 30, 2017
Building a Custom Strain Gauge with Electric Paint
In this video we look at how we can use Bare Conductive's Electric Paint to create a custom strain gauge.
/*
* This code was written for a video on the ForceTronics YouTube channel. This code is public domain and can be used and modified by anybody at your own risk
*/
#include <Average.h> //Call average library
void setup() {
Serial.begin(57600);
analogReadResolution(12); //Set Arduino Zero ADC to 12 bits
for(int i=0;i<4;i++) analogRead(A0); //burn a couple readings since we changed ADC setting
Average<int> ave(10);
}
void loop() {
delay(100);
Average<int> ave(10); //Create average object
for (int i=0; i<10;i++) ave.push(analogRead(A0) - 2700); //get 10 readings and subtract most of the value off to look at small changes
Serial.println(ave.mean()); //average the 10 readings together
}
/*
* This code was written for a video on the ForceTronics YouTube channel. This code is public domain and can be used and modified by anybody at your own risk
*/
#include <Average.h> //Call average library
void setup() {
Serial.begin(57600);
analogReadResolution(12); //Set Arduino Zero ADC to 12 bits
for(int i=0;i<4;i++) analogRead(A0); //burn a couple readings since we changed ADC setting
Average<int> ave(10);
}
void loop() {
delay(100);
Average<int> ave(10); //Create average object
for (int i=0; i<10;i++) ave.push(analogRead(A0) - 2700); //get 10 readings and subtract most of the value off to look at small changes
Serial.println(ave.mean()); //average the 10 readings together
}
Thursday, April 6, 2017
Home Automation with the Arduino and the Amazon Echo Part 2
In this video series we look at how to use Arduino (ESP8266) and the Amazon Echo to do voice controlled home automation.
Link to project material on GitHub: https://github.com/ForceTronics/Arduino_Echo_Home_Automation
//************************************ESP8266 Arduino code*********************
/*
This sketch was created for a video series called Home Automation with the Arduino and the Amazon Echo Part 2
That was presented on the ForceTronics YouTube Channel. This code is public domain for anybody to use or modify at your own risk
Note that this code was leveraged from a Sparkfun example on using their cloud service Phant
*/
// Include the ESP8266 WiFi library
#include <ESP8266WiFi.h>
// Include the SparkFun Phant library.
#include <Phant.h>
//Set your network name and password
const char WiFiSSID[] = "NetworkName"; //your wifi network name goes here
const char WiFiPSK[] = "NetworkPassword"; //your wifi password goes here
//define constants for pin control and node number
const int light = 4; //NodeMCU GPIO 4 pin is connected to the WiFi AC Switch control
const char parseKey[] = "stamp"; //This is used to parse through data from Phant to find light setting
//declare phant address and security keys
const char PhantHost[] = "data.sparkfun.com";
const char gPublicKey[] = "YourPublicKey"; //your phant public key goes here
const char gPrivateKey[] = "YourPrivateKey"; //your phant private key goes here
//specify the rate that you post data to cloud
const unsigned long postRate = 1000;
unsigned long lastPost = 0;
void setup()
{
initHardware(); //setup arduino hardware
connectWiFi(); //Connect your WiFi network
digitalWrite(LED_BUILTIN, HIGH); //turn on LED
}
void loop()
{ //loop until it is time to post data to phant cloud, variable "postRate" defines the interval in milli seconds
if (lastPost + postRate <= millis())
{
if (getFromPhant()) lastPost = millis(); //get data from Phant
else lastPost = millis(); //Even if we fail delay whole cycle before we try again
}
}
//function used to connect to WiFi network
void connectWiFi()
{
byte ledStatus = LOW;
// Set WiFi mode to station (as opposed to AP or AP_STA)
WiFi.mode(WIFI_STA);
// WiFI.begin([ssid], [passkey]) initiates a WiFI connection
// to the stated [ssid], using the [passkey] as a WPA, WPA2,
// or WEP passphrase.
WiFi.begin(WiFiSSID, WiFiPSK);
// Use the WiFi.status() function to check if the ESP8266
// is connected to a WiFi network.
while (WiFi.status() != WL_CONNECTED)
{
// Blink the LED
digitalWrite(LED_BUILTIN, ledStatus); // Write LED high/low
ledStatus = (ledStatus == HIGH) ? LOW : HIGH;
// Delays allow the ESP8266 to perform critical tasks
// defined outside of the sketch. These tasks include
// setting up, and maintaining, a WiFi connection.
delay(100);
}
}
//function that sets up some initial hardware states
void initHardware()
{
pinMode(light, OUTPUT); //turn light off at startup
digitalWrite(light, LOW);
}
//function that handles getting data from phant cloud
int getFromPhant()
{
//Set phant data
Phant phant(PhantHost, gPublicKey, gPrivateKey);
WiFiClient client; //Create client object to communicate with the phant server
if (!client.connect(PhantHost, 80)) { //Attempt to connect to phant server using port 80
// If we fail to connect, return 0.
return 0;
}
//Get data from phant cloud
client.print(phant.get());
client.println();
int cTrack = 0; //variable that tracks count to spell stamp
bool match = false; //tracks when we have a match with "stamp" and we can then get control data
int pCount = 0; //variable used to track when we have control data
while(1) { //loop until we get data and server closes connection
if (client.available()) { //if data is available from phant server
char c = client.read(); //read a bite of data from server
if(!match) { //if true than we have not found the word "stamp" so keep looking
if(c == parseKey[cTrack]) //check if we have a character match with word "stamp"
{
if(cTrack == (sizeof(parseKey)-2)) match = true; //if true it means we found a match for "stamp" in data from phant cloud
cTrack++; //iterate this count if a character match was found
}
else { //if true means no character match so reset count
cTrack = 0;
}
}
else { //if true it means we found a match to "stamp" and we are ready to get control data
if(pCount == 1) { //if true we are at the point in the data to read control data for node oen
int dControl = c - '0'; //convert char data to an int by subtract an ASCII zero
if(dControl == 1 | dControl == 0) digitalWrite(light, dControl); //make sure data is a one or zer and set LED pin with it
}
pCount++; //iterate the parse counter
}
}
// if the server's disconnected, stop the client:
if (!client.connected()) {
client.stop(); //stop client, if you don't have this you will create too many clients and server won't let you connect anymore
break; //This is how we get out of the loop
}
}
return 1; // Return success
}
Link to project material on GitHub: https://github.com/ForceTronics/Arduino_Echo_Home_Automation
//************************************ESP8266 Arduino code*********************
/*
This sketch was created for a video series called Home Automation with the Arduino and the Amazon Echo Part 2
That was presented on the ForceTronics YouTube Channel. This code is public domain for anybody to use or modify at your own risk
Note that this code was leveraged from a Sparkfun example on using their cloud service Phant
*/
// Include the ESP8266 WiFi library
#include <ESP8266WiFi.h>
// Include the SparkFun Phant library.
#include <Phant.h>
//Set your network name and password
const char WiFiSSID[] = "NetworkName"; //your wifi network name goes here
const char WiFiPSK[] = "NetworkPassword"; //your wifi password goes here
//define constants for pin control and node number
const int light = 4; //NodeMCU GPIO 4 pin is connected to the WiFi AC Switch control
const char parseKey[] = "stamp"; //This is used to parse through data from Phant to find light setting
//declare phant address and security keys
const char PhantHost[] = "data.sparkfun.com";
const char gPublicKey[] = "YourPublicKey"; //your phant public key goes here
const char gPrivateKey[] = "YourPrivateKey"; //your phant private key goes here
//specify the rate that you post data to cloud
const unsigned long postRate = 1000;
unsigned long lastPost = 0;
void setup()
{
initHardware(); //setup arduino hardware
connectWiFi(); //Connect your WiFi network
digitalWrite(LED_BUILTIN, HIGH); //turn on LED
}
void loop()
{ //loop until it is time to post data to phant cloud, variable "postRate" defines the interval in milli seconds
if (lastPost + postRate <= millis())
{
if (getFromPhant()) lastPost = millis(); //get data from Phant
else lastPost = millis(); //Even if we fail delay whole cycle before we try again
}
}
//function used to connect to WiFi network
void connectWiFi()
{
byte ledStatus = LOW;
// Set WiFi mode to station (as opposed to AP or AP_STA)
WiFi.mode(WIFI_STA);
// WiFI.begin([ssid], [passkey]) initiates a WiFI connection
// to the stated [ssid], using the [passkey] as a WPA, WPA2,
// or WEP passphrase.
WiFi.begin(WiFiSSID, WiFiPSK);
// Use the WiFi.status() function to check if the ESP8266
// is connected to a WiFi network.
while (WiFi.status() != WL_CONNECTED)
{
// Blink the LED
digitalWrite(LED_BUILTIN, ledStatus); // Write LED high/low
ledStatus = (ledStatus == HIGH) ? LOW : HIGH;
// Delays allow the ESP8266 to perform critical tasks
// defined outside of the sketch. These tasks include
// setting up, and maintaining, a WiFi connection.
delay(100);
}
}
//function that sets up some initial hardware states
void initHardware()
{
pinMode(light, OUTPUT); //turn light off at startup
digitalWrite(light, LOW);
}
//function that handles getting data from phant cloud
int getFromPhant()
{
//Set phant data
Phant phant(PhantHost, gPublicKey, gPrivateKey);
WiFiClient client; //Create client object to communicate with the phant server
if (!client.connect(PhantHost, 80)) { //Attempt to connect to phant server using port 80
// If we fail to connect, return 0.
return 0;
}
//Get data from phant cloud
client.print(phant.get());
client.println();
int cTrack = 0; //variable that tracks count to spell stamp
bool match = false; //tracks when we have a match with "stamp" and we can then get control data
int pCount = 0; //variable used to track when we have control data
while(1) { //loop until we get data and server closes connection
if (client.available()) { //if data is available from phant server
char c = client.read(); //read a bite of data from server
if(!match) { //if true than we have not found the word "stamp" so keep looking
if(c == parseKey[cTrack]) //check if we have a character match with word "stamp"
{
if(cTrack == (sizeof(parseKey)-2)) match = true; //if true it means we found a match for "stamp" in data from phant cloud
cTrack++; //iterate this count if a character match was found
}
else { //if true means no character match so reset count
cTrack = 0;
}
}
else { //if true it means we found a match to "stamp" and we are ready to get control data
if(pCount == 1) { //if true we are at the point in the data to read control data for node oen
int dControl = c - '0'; //convert char data to an int by subtract an ASCII zero
if(dControl == 1 | dControl == 0) digitalWrite(light, dControl); //make sure data is a one or zer and set LED pin with it
}
pCount++; //iterate the parse counter
}
}
// if the server's disconnected, stop the client:
if (!client.connected()) {
client.stop(); //stop client, if you don't have this you will create too many clients and server won't let you connect anymore
break; //This is how we get out of the loop
}
}
return 1; // Return success
}
Subscribe to:
Posts (Atom)