Showing posts with label switch. Show all posts

Saturday, November 13, 2021

How to Build a Switch Debounce Circuit for a Rotary Encoder


In this tutorial we look at how to combat switch bounce when using a rotary encoder with a debounce circuit made up of fairly basic components (see below). We use the KY-040 encoder as the test subject in the video. Below is the parts list from the video.
Parts list: BAS16-HE3-18 (Diode), SN74LVC1G17QDCKRQ1 (Schmitt Trigger), standard 0805 resistors (300ohms and 15kohms), and 4.7uF 0805 ceramic capacitor

Code from example ESP32 and KY-040 application in the video
//**************************************************************************************************************
//This sketch demonstrates how to use the KY-040 encoder //link to KY-040 https://www.epitran.it/ebayDrive/datasheet/25.pdf //encoder pins #include <Adafruit_NeoPixel.h> #define ECLK 26 //encoder CLK pin #define EDT 25 //encoder DT pin #define ESW 35 //encoder SW pin #define LED_PIN 13 //pin for LED comm #define LED_CNT 1 //LED cnt #define BRIGHTNESS 125 //LED brightness setting //First argument is number of LEDs, second is arduino pin Adafruit_NeoPixel pixels = Adafruit_NeoPixel(LED_CNT,LED_PIN, NEO_GRB + NEO_KHZ800); const uint32_t off = pixels.Color(0, 0, 0); //RGB value for off const uint32_t white = pixels.Color(127, 127, 127); //RGB color for white const uint32_t blue = pixels.Color(30,144,255); //RGB color for blue const uint32_t red = pixels.Color(255, 0, 0); //RGB color for red volatile bool buttonFlag = false; //flag that tracks if button was pressed volatile uint8_t encoderFlag = 0; //flog for tracking encoder turns bool ledState = false; //tracks whether to turn LED off or on for button presses //interrupt service routine for an encoder turn CC or CCW void IRAM_ATTR ISR() { encoderFlag = true; } //interrupt service routine for an encoder button press void IRAM_ATTR ISR2() { buttonFlag = true; } void setup() { pinMode(ECLK,INPUT); //setup encoder pins pinMode(EDT,INPUT); pinMode(ESW,INPUT); attachInterrupt(ECLK, ISR, FALLING); //setup encoder interrupts attachInterrupt(ESW, ISR2, FALLING); pixels.begin(); //start RGB LED object pixels.setBrightness(BRIGHTNESS); //set LED brightness setLED(off); //set LED off } void loop() { if(encoderFlag) { //encoder knob was turned if(digitalRead(EDT)) { //encoder turned clockwise setLED(blue); } else { //encoder was turned counter clockwise setLED(red); } encoderFlag = false; //reset flag } if(buttonFlag) { //button was pressed buttonFlag = false; //reset flag if(ledState) { setLED(off); ledState = false; } else { setLED(white); ledState = true; } } } //sets LED to a specified RGB color //input is the RGB value void setLED(uint32_t color) { for(int i=0;i<1;i++){ pixels.setPixelColor(i,color); //set LED color pixels.show(); //send updated state to LED } }


Friday, December 16, 2016

Measuring Wind Speed with an Anemometer and Arduino

In this video we look at how to measure wind speed using an anemometer and Arduino. This approach will work on both ARM and AVR based Arduinos.


//*****************Arduino anemometer sketch******************************
const byte interruptPin = 3; //anemomter input to digital pin
volatile unsigned long sTime = 0; //stores start time for wind speed calculation
unsigned long dataTimer = 0; //used to track how often to communicate data
volatile float pulseTime = 0; //stores time between one anemomter relay closing and the next
volatile float culPulseTime = 0; //stores cumulative pulsetimes for averaging
volatile bool start = true; //tracks when a new anemometer measurement starts
volatile unsigned int avgWindCount = 0; //stores anemometer relay counts for doing average wind speed
float aSetting = 60.0; //wind speed setting to signal alarm

void setup() {
  pinMode(13, OUTPUT); //setup LED pin to signal high wind alarm condition
  pinMode(interruptPin, INPUT_PULLUP); //set interrupt pin to input pullup
  attachInterrupt(interruptPin, anemometerISR, RISING); //setup interrupt on anemometer input pin, interrupt will occur whenever falling edge is detected
  dataTimer = millis(); //reset loop timer
}

void loop() {
 
  unsigned long rTime = millis();
  if((rTime - sTime) > 2500) pulseTime = 0; //if the wind speed has dropped below 1MPH than set it to zero
     
  if((rTime - dataTimer) > 1800){ //See if it is time to transmit
   
    detachInterrupt(interruptPin); //shut off wind speed measurement interrupt until done communication
    float aWSpeed = getAvgWindSpeed(culPulseTime,avgWindCount); //calculate average wind speed
    if(aWSpeed >= aSetting) digitalWrite(13, HIGH);   // high speed wind detected so turn the LED on
    else digitalWrite(13, LOW);   //no alarm so ensure LED is off
    culPulseTime = 0; //reset cumulative pulse counter
    avgWindCount = 0; //reset average wind count

    float aFreq = 0; //set to zero initially
    if(pulseTime > 0.0) aFreq = getAnemometerFreq(pulseTime); //calculate frequency in Hz of anemometer, only if pulsetime is non-zero
    float wSpeedMPH = getWindMPH(aFreq); //calculate wind speed in MPH, note that the 2.5 comes from anemometer data sheet
   
    Serial.begin(57600); //start serial monitor to communicate wind data
    Serial.println();
    Serial.println("...................................");
    Serial.print("Anemometer speed in Hz ");
    Serial.println(aFreq);
    Serial.print("Current wind speed is ");
    Serial.println(wSpeedMPH);
    Serial.print("Current average wind speed is ");
    Serial.println(aWSpeed);
    Serial.end(); //serial uses interrupts so we want to turn it off before we turn the wind measurement interrupts back on
   
    start = true; //reset start variable in case we missed wind data while communicating current data out
    attachInterrupt(digitalPinToInterrupt(interruptPin), anemometerISR, RISING); //turn interrupt back on
    dataTimer = millis(); //reset loop timer
  }
}

//using time between anemometer pulses calculate frequency of anemometer
float getAnemometerFreq(float pTime) { return (1/pTime); }
//Use anemometer frequency to calculate wind speed in MPH, note 2.5 comes from anemometer data sheet
float getWindMPH(float freq) { return (freq*2.5); }
//uses wind MPH value to calculate KPH
float getWindKPH(float wMPH) { return (wMPH*1.61); }
//Calculates average wind speed over given time period
float getAvgWindSpeed(float cPulse,int per) {
  if(per) return getWindMPH(getAnemometerFreq((float)(cPulse/per)));
  else return 0; //average wind speed is zero and we can't divide by zero
  }

//This is the interrupt service routine (ISR) for the anemometer input pin
//it is called whenever a falling edge is detected
void anemometerISR() {
  unsigned long cTime = millis(); //get current time
  if(!start) { //This is not the first pulse and we are not at 0 MPH so calculate time between pulses
   // test = cTime - sTime;
    pulseTime = (float)(cTime - sTime)/1000;
    culPulseTime += pulseTime; //add up pulse time measurements for averaging
    avgWindCount++; //anemomter went around so record for calculating average wind speed
  }
  sTime = cTime; //store current time for next pulse time calculation
  start = false; //we have our starting point for a wind speed measurement
}

Friday, December 9, 2016

Eliminating Switch Bounce with a Debounce Circuit

In video we discuss what is switch bounce and how to implement a simple and low cost debounce circuit to eliminate switch bounce.


Debounce circuit used in video

Thursday, December 31, 2015

Building an AC Power Switch Development Board

Ever want to create a design that automates turning on or off an AC powered device such as a light or a heating system? Well this video is for you! In this video we look at how to create a development board for switching on and off AC power. The switch is implemented with a TRIAC which is a semiconductor device so no moving parts like a relay based design. You can access the Eagle PCB layout files from this link https://github.com/ForceTronics/AC-Switch-Proto-Board/tree/master or you can purchase this development board from www.forcetronics.com


Download Eagles files from GitHub: https://github.com/ForceTronics/AC-Switch-Proto-Board

*********************************Arduino code shown in the video********
//This sketch is used to control Thyristor that is used as a switch to turn on and off an AC line powered light. //This code is free for all to use
int8_t dig = 0; //default is high for light off

void setup() {
  //for controlling Thyristor
  pinMode(7, OUTPUT); //set pin to output so it can sink current from optoisolator
  digitalWrite(7, HIGH); //when high the thyristor is off or open
}

void loop() {
  delay(3000); //light turns on / off every 2 seconds
  togLight(); //call function to turn light on / off using digital pin
}

void togLight() {
  if(dig) { 
     digitalWrite(7, HIGH); //turn off light
     dig = 0; //toggle dig value
  }
  else {  
     digitalWrite(7, LOW); //turn light on
     dig = 1; 
   }
}


Tuesday, July 21, 2015

Using a Transistor as a Switch

In this video we cover briefly what a transistor is and discuss how to use them as an electrical switch (DC only). As a demonstration we use an Arduino to switch on and off an NPN transistor and a PNP transistor.


//************************Arduino Code ******************************
//This example code was used on the Forcetronics YouTube Channel to demonstrate how to
//make an inverter or not gate using an NPN and PNP transistor. This code is open for
//anybody to use or modify

const int BJT = 2; //create variable to control the base of NPN and PNP

void setup() {
  pinMode(BJT, OUTPUT);   // set it as digital output
}

void loop() {
  digitalWrite(BJT, LOW);   // set base of NPN and PNP to low
  delay(1000);
  digitalWrite(BJT, HIGH);   // set base of NPN and PNP to high
  delay(1000);
}

Sunday, January 25, 2015

How to Use a MOSFET as a Switch

In this video we will cover:
  • What is a MOSFET
  • MOSFET switch vs mechanical switch
  • How to use MOSFET as a switch
  • Go over example using a MOSFET as a switch with Arduino


Arduino Code********************************************************************
//This example code was used on the Forcetronics YouTube Channel to demonstrate how to use 
//A MOSFET as a switch. The code is open for anybody to use or modify

const int nMOS = 2; //create variable for n channel MOSFET pin
const int pMOS = 3; //create variable for p channel MOSFET pin

void setup() {
  pinMode(nMOS, OUTPUT);   // set pin to output
  pinMode(pMOS, OUTPUT);   // set pin to output
}

void loop() {
  digitalWrite(nMOS, HIGH);   // set n MOSFET gate to high, this will turn it on or close switch
  digitalWrite(pMOS, HIGH);   // set p MOSFET gate to high, this will turn it off or open switch
  delay(750);
  digitalWrite(nMOS, LOW);    // set n MOSFET gate to low, this will turn it off or open switch
  digitalWrite(pMOS, LOW);    // set p MOSFET gate to low, this will turn it on or close switch
  delay(750);
}

Sunday, June 1, 2014

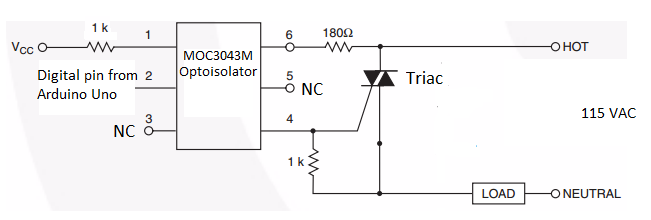
Switching AC Line Power with a Thyristor (TRIAC)

In this video we look at how to use a Thyristor (TRIAC) as an AC line power switch. Great tool to use in home automation projects for turning on or off a light or building your own thermostat.


Thyristor Example Circuit


//This sketch is used to control Thyristor that is used as a switch to turn on and off an AC line powered light. //This code is free for all to use
int8_t dig = 1; //default is high for light off

void setup() {
  //for controlling Thyristor
  pinMode(3, OUTPUT); //set pin to output so it can sink current from optoisolator
  digitalWrite(3, HIGH); //when high the thyristor is off or open
}

void loop() {
  delay(2000); //light turns on / off every 2 seconds
  togLight(); //call function to turn light on / off using digital pin
}

void togLight() {
  if(dig) { 
     digitalWrite(3, HIGH); //turn off light
     dig = 0; //toggle dig value
  }
  else {  
     digitalWrite(3, LOW); //turn light on
     dig = 1; 
   }
}